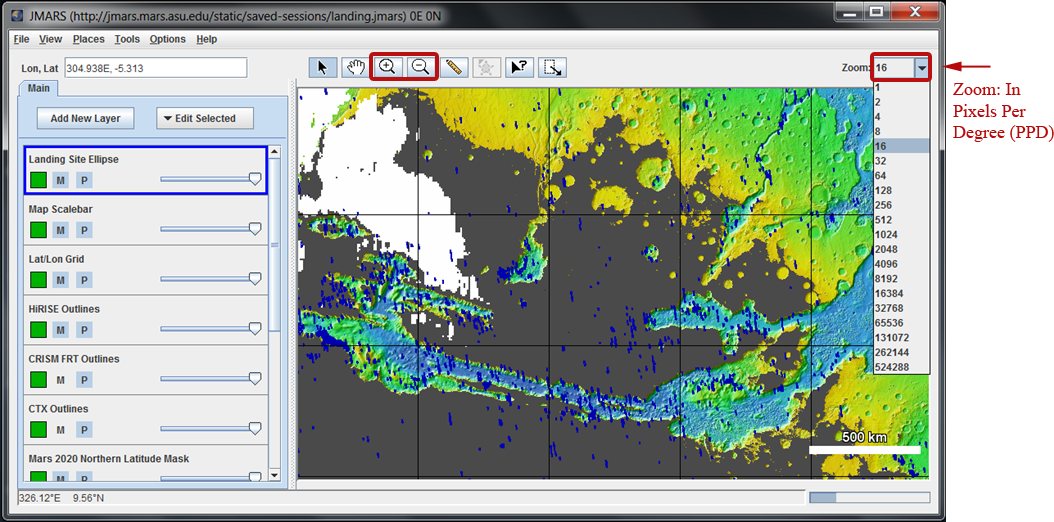
Introduction to JMARS2020
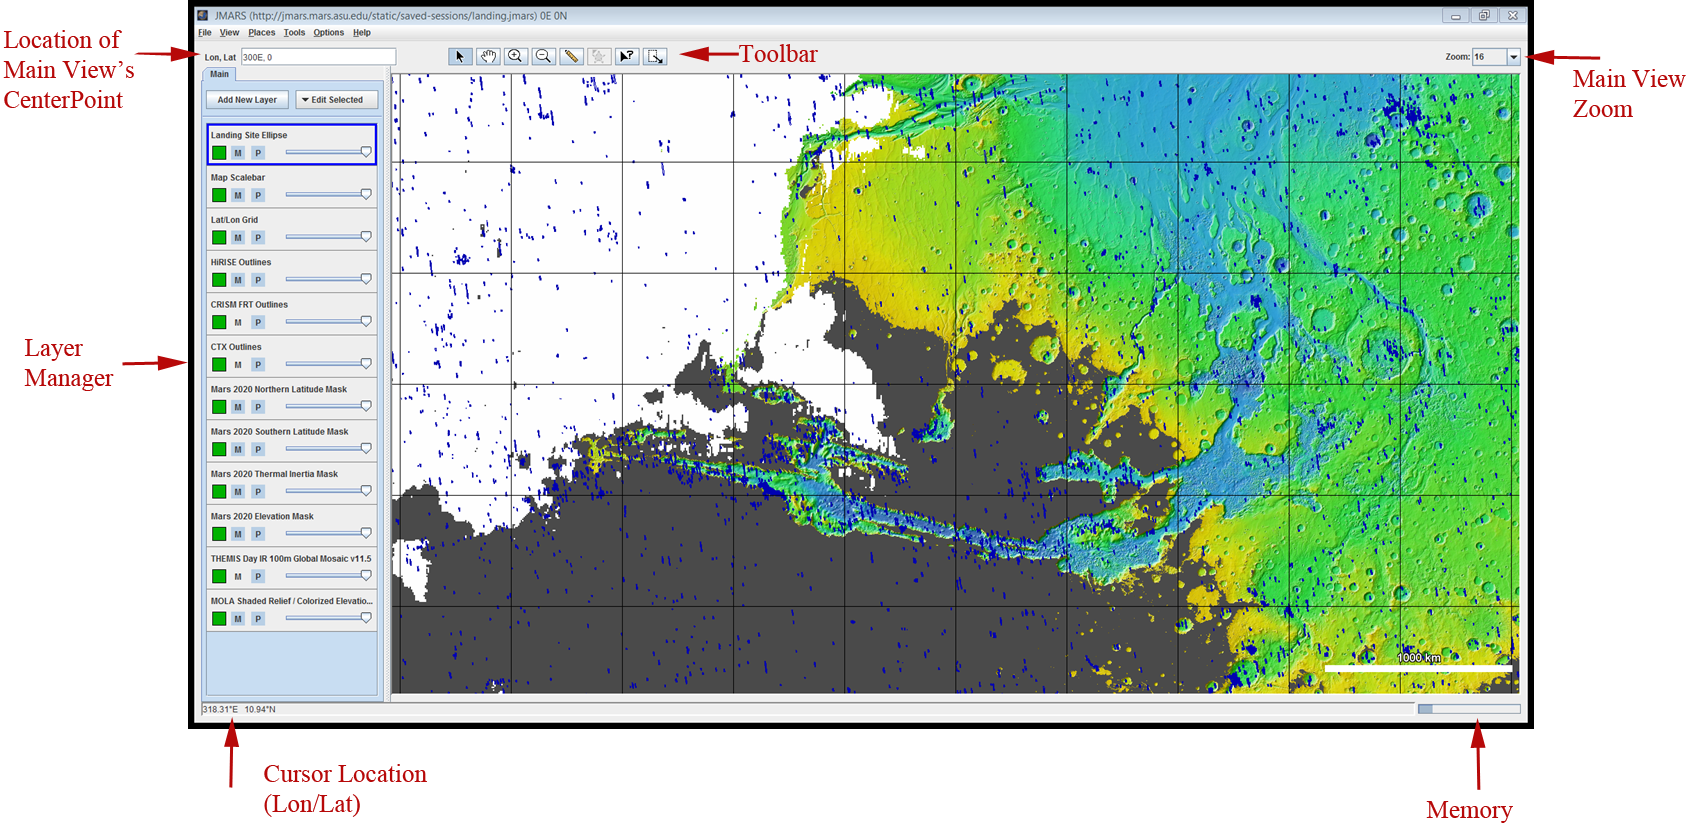
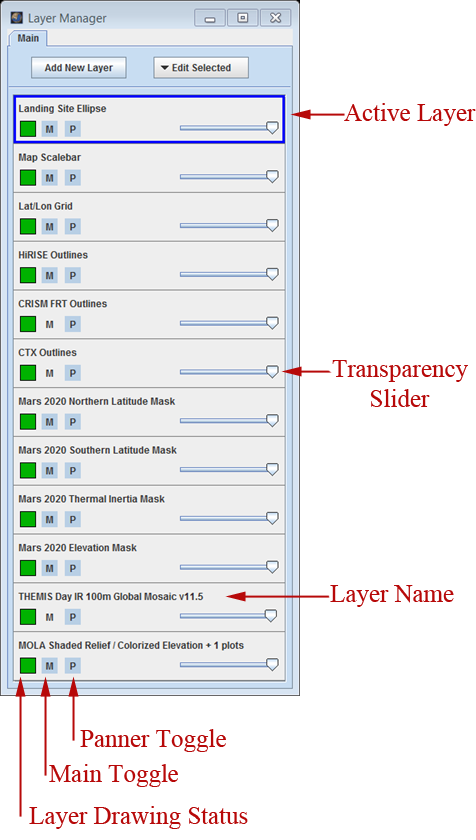
Below is an image that shows the main JMARS2020 user interface. It consists of two main sections: the Layer Manager and the
Viewing Window.
Pre-loaded Layer Explanations:
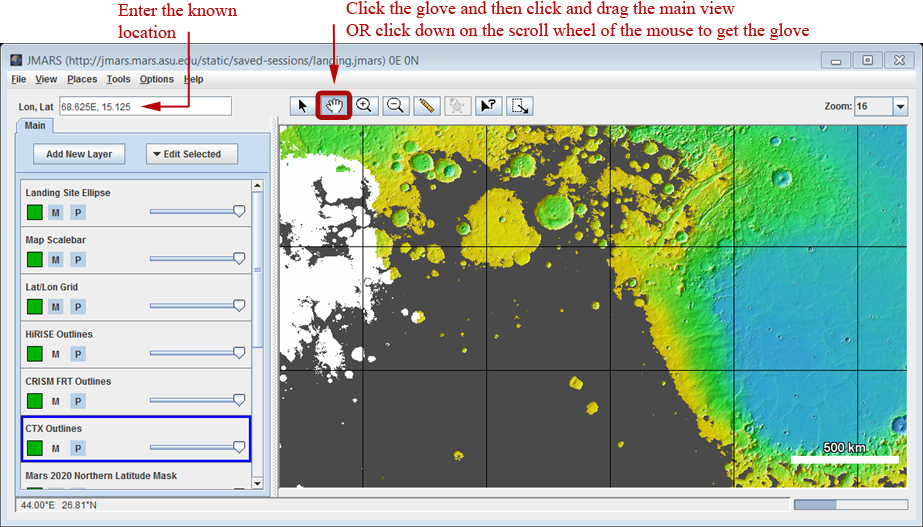
Landing Site Ellipse: The Landing Site Ellipse layer is to assist in the selection of possible landing sites for the 2020 Mars rover.
To draw the possible landing sites, the layer must be active. To do so, click the layer in the layer manager and make sure it is
outlined in blue. This indicates the layer is active. There are two sizes to choose from, 18km and 25km. To change between
the two you can use the scroll wheel on the mouse or press the '+' and '-' keys. Holding Ctrl while using the scroll wheel
will change the color of the circle. The mouse mode can be changed to selection from addition mode by right clicking
and selecting the desired mode in the menu. Notes can be added to different colors, and the entire layer can be exported
into a csv.
HiRISE Outlines: The High Resolution Imaging Science Experiment (HiRISE) camera offers unprecedented image
quality, giving us a view of the Red Planet in a way never before seen. It's the most powerful camera ever to leave
Earth's orbit. HiRISE offers three data sets, the Experiment Data Record (EDR) data set, the Reduce Data Record (RDR),
and the Digital Terrain Model (DTM) data set. Full resolution HiRISE stamps are accurately projected data for use with
other datasets such as CTX data.
CRISM FRT Outlines: The Compact Reconnaissance Imaging Spectrometer for Mars (CRISM) is a visible-infrared imaging
spectrometer with a scannable field of view. CRISM can cover wavelengths from 0.362 to 3.92 microns (362 to 3920 nanometers)
at 6.55 nanometers/channel, enabling the CRISM team to identify a broad range of minerals on the Martian surface.
CTX Outlines: The Mars Reconnaissance Orbiter (MRO) Context Camera (CTX) is designed to obtain grayscale (black & white)
images of Mars at 6 meters per pixel scale over a swath 30 kilometers wide. CTX provides context images for the MRO HiRISE and CRISM.
The instrument consists of a 350 mm focal length, 6° field of view, catadioptric Cassegrain (Maksutov-type) telescope that images onto
a 5064 pixels-wide charge coupled device (CDD) line array. The CCD detects a broad band of visible light from 500 to 800 nanometers in wavelength. The instrument
includes a 256 MB DRAM buffer, so that it can acquire pictures that have downtrack lengths greater than 160 kilometers (99 miles). In other words,
a typical CTX image can be as wide as 30 km and as long as 160 km, or more.
Mars 2020 Northern Latitude Mask: This mask was generated for use with the Mars 2020 landing site selection process. This layer masks out
latitudes above 30 of the equator in accordance with engineering constraints for the landing site.
Mars 2020 Southern Latitude Mask: This mask was generated for use with the Mars 2020 landing site selection process. This layer masks out
latitudes below 30 of the equator in accordance with engineering constraints for the landing site.
Mars 2020 Thermal Inertia Mask: This mask was generated for use with the Mars 2020 landing site selection process. This layer uses the TES
Thermal Inertia map produced by Phil Christensen to mask out areas with thermal inertia of less than 100 in accordance with engineering requirements to avoid
surfaces dominated by dust.
Mars 2020 Elevation Mask: This mask was generated for use with the Mars 2020 landing site selection process. This dataset uses MOLA 128ppd elevation
with the threshold to mask out all elevations higher than 0.5 km.
THEMIS Day IR 100m Global Mosaic v11.5: THEMIS Day IR 100 meter/pixel Global Mosaic. The THEMIS 100m/px relative temperature daytime global mosaics
were created at the Mars Space Flight Facility, at Arizona State University, Tempe, Arizona, USA. THEMIS daytime data were selected with the following parameters:
shutter closing time less than 150 seconds, incidence angle less than 85, minimum surface temperature greater than or equal to 160K, 0% saturated pixels from 90S to
90N with unsummed data.
MOLA Shaded Relief/Colorized Elevation: This Mars Orbiter Laser Altimeter (MOLA) instrument colorized shaded relief data layer is derived from Planetary Data
System source images at http://pds-geosciences.wustl.edu/missions/mgs/mola.html. This data product is a shape map of Mars at a resolution of 0.00781 (1/128) by 0.00781
degrees, based on altimetry data acquired by the Mars Global Surveyor MOLA instrument and accumulated over the course of the primary and extended mission. The MOLA Precision
Experiment Data Records (PEDRs) are the source for this data set. The map is in the form of a binary table with one row for each 0.00781-degree latitude. Map coordinates use the
IAU2000 reference system. The binned data include all MOLA nadir observations from the Mapping Phase through the Primary and Extended missions, from the end of aerobraking in
February 1999 through June 2001. Additionally, off-nadir observations of the North pole are included from 87 N latitude and northward, taken during the spring of 1998, and of
both poles taken during Mapping from 87 N and S to the poles. Data are adjusted using a first-order crossover solution for radial, along-track, and across-track position. Parts
of orbits are excluded where solutions for these orbits are deemed to be poor. (Note: subtract 10000 from a MOLA mapping phase orbit number to determine the equivalent MGS Project
orbit number.) Also excluded are shots more than 1.2 degree off-nadir (except as noted above), channel 4 returns, and any returns not classified as ground returns, e.g. clouds or noise,
according to the SHOT_CLASSIFICATION_CODE. A total of nearly 600,000,000 observations are represented.