- Home
- Getting Started
- Documentation
- Release Notes
- Tour the Interface
- Tour the Layers
- JMARS Video Tutorials
- Lat/Lon Grid Layer
- Map Scalebar
- Nomenclature
- Crater Counting
- 3D
- Shape Layer
- Mosaics
- Map
- Advanced/Custom Maps
- Graphic/Numeric Maps
- Custom Map Sharing
- Stamp
- THEMIS
- MOC
- Viking
- CRISM Stamp Layer
- CTX
- HiRise
- HiRISE Anaglyph
- HiRISE DTM
- HRSC
- OMEGA
- Region of Interest
- TES
- THEMIS Planning
- Investigate Layer
- Landing Site Layer
- Tutorials
- Video Tutorials
- Displaying the Main View in 3D
- Finding THEMIS Observation Opportunities
- Submitting a THEMIS Region of Interest
- Loading a Custom Map
- Viewing TES Data in JMARS
- Using the Shape Layer
- Shape Layer: Intersect, Merge, and Subtract polygons from each other
- Shape Layer: Ellipse Drawing
- Shape Layer: Selecting a non-default column for circle-radius
- Shape Layer: Selecting a non-default column for fill-color
- Shape Layer: Add a Map Sampling Column
- Shape Layer: Adding a new color column based on the values of a radius column
- Shape Layer: Using Expressions
- Using JMARS for MSIP
- Introduction to SHARAD Radargrams
- Creating Numeric Maps
- Proxy/Firewall
- JMARS Shortcut Keys
- JMARS Data Submission
- FAQ
- Open Source
- References
- Social Media
- Podcasts/Demos
- Download JMARS
Export Graphic Tiffs
Exporting Images and Geospatial Data in JMARS
JMARS provides three options for exporting images. These options replace Export PNG, Export JPG, High Resolution Export, and Export TIFF Information and Data.
- Quick Image Export: Saves the Main View as a standard image, such as a PNG or JPG. This option does not include georeferencing.
- Export Graphic Data: Exports the Main View or individual graphic layers, with or without georeferencing.
- Export Numeric Data: Exports selected numeric layers as individual images, with or without georeferencing.
**Important: Before exporting an image, the Main View must be reprojected and centered. Press Ctrl+R, or select View → Recenter Projection.**
Quick Image Export
-
Select File → New Export Options → Quick Image Export.
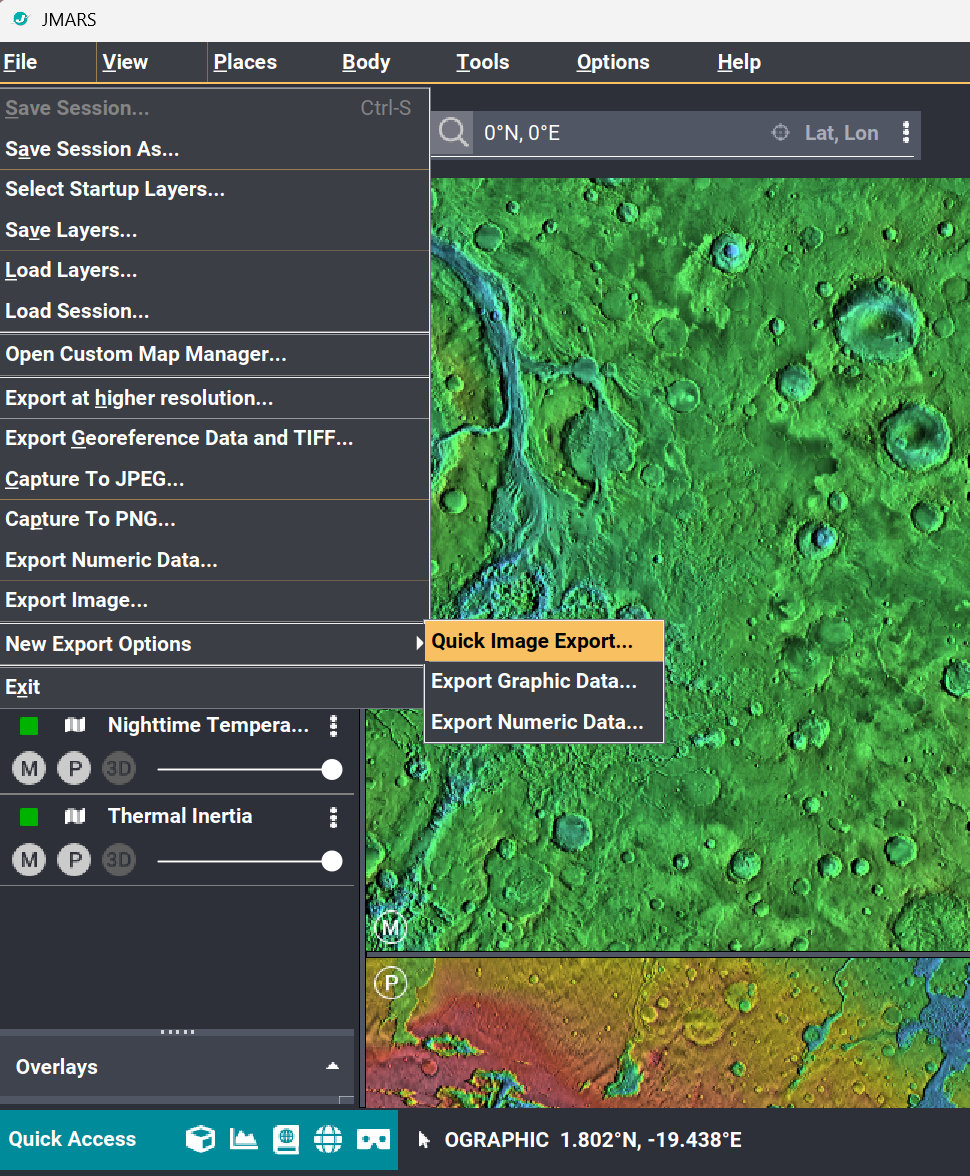
- In the Export dialog, select the location where you want to save the image.
-
Enter a file name and select the image file type.
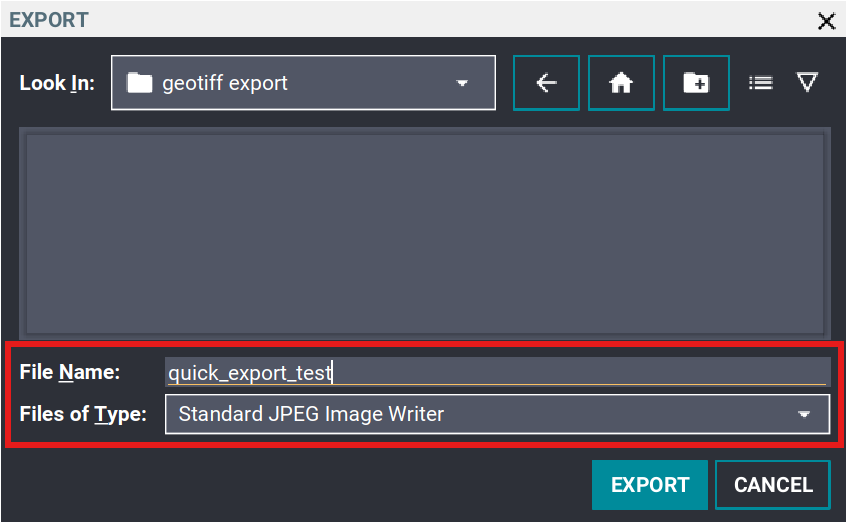
- Click Export to save an image of the Main View.
Export Graphic Data
-
Select File → New Export Options → Export Graphic Data.
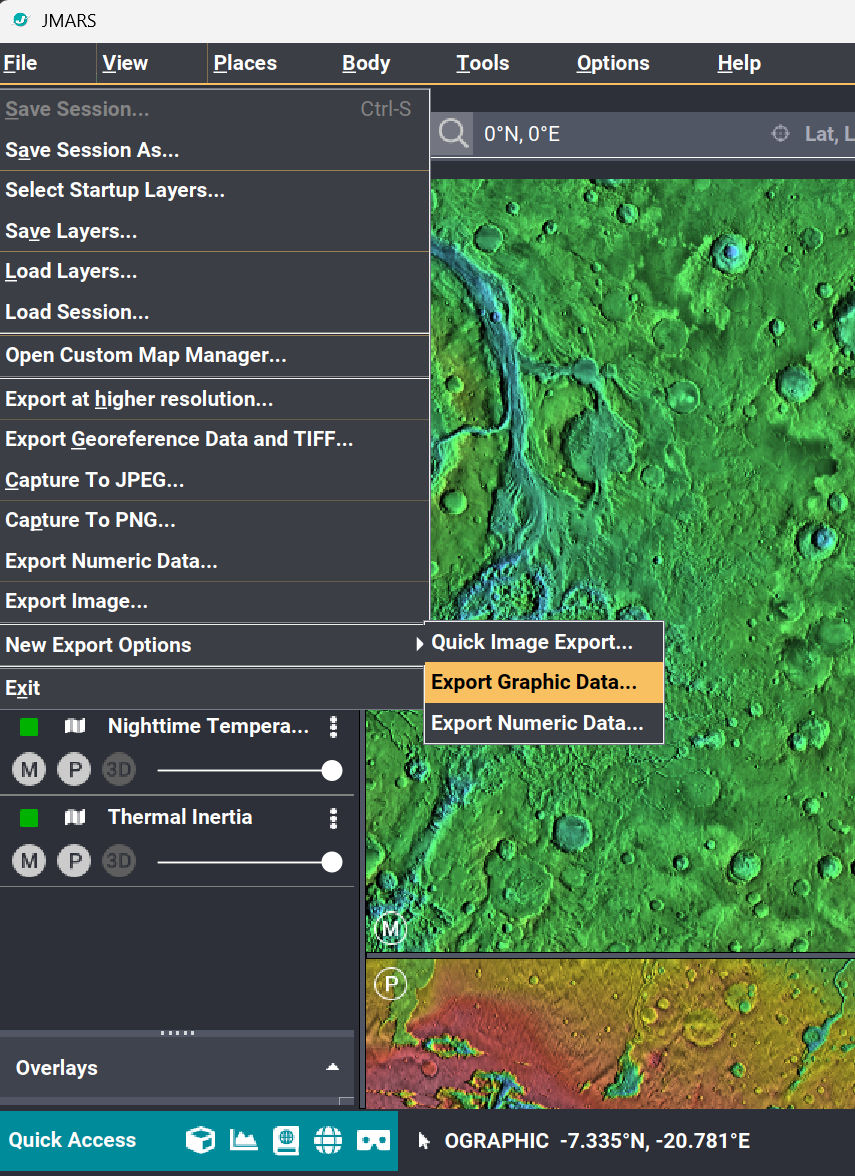
- When the Export Data window opens, click Select Directory and choose where the exported image or images will be saved.
-
Select an export type:
- Static Image: Exports the image as it appears in JMARS without projection or coordinate information. Select this option when you only need a standard image for viewing, presentations, or documents.
- Reprojected and Geo-referenced Image(s): Reprojects the image and includes geographic information in the exported file. Select this option when the image will be opened in GIS software or imported as a georeferenced map.
Internally, JMARS uses an Oblique Cylindrical projection. For georeferenced exports, mid-latitude images are reprojected to an Equirectangular projection. Images in the north and south polar regions are reprojected to a Polar Stereographic projection.
- Choose the export resolution using PPD (Zoom Level). PPD means pixels per degree. It is initially set to match the Main View when the Export Data window opens, but it can be changed before exporting.
Graphic data can be exported from the Main View, as individual layers, or both.
Option 1: Export the Main View
- Select Export Main View.
- Enter a file name and select an export file type.
This option exports everything currently visible in the Main View, including displayed shapes and overlays. Graphics such as grid lines, shapes, and navigation arrows may not scale correctly in the exported image. Review the output carefully.
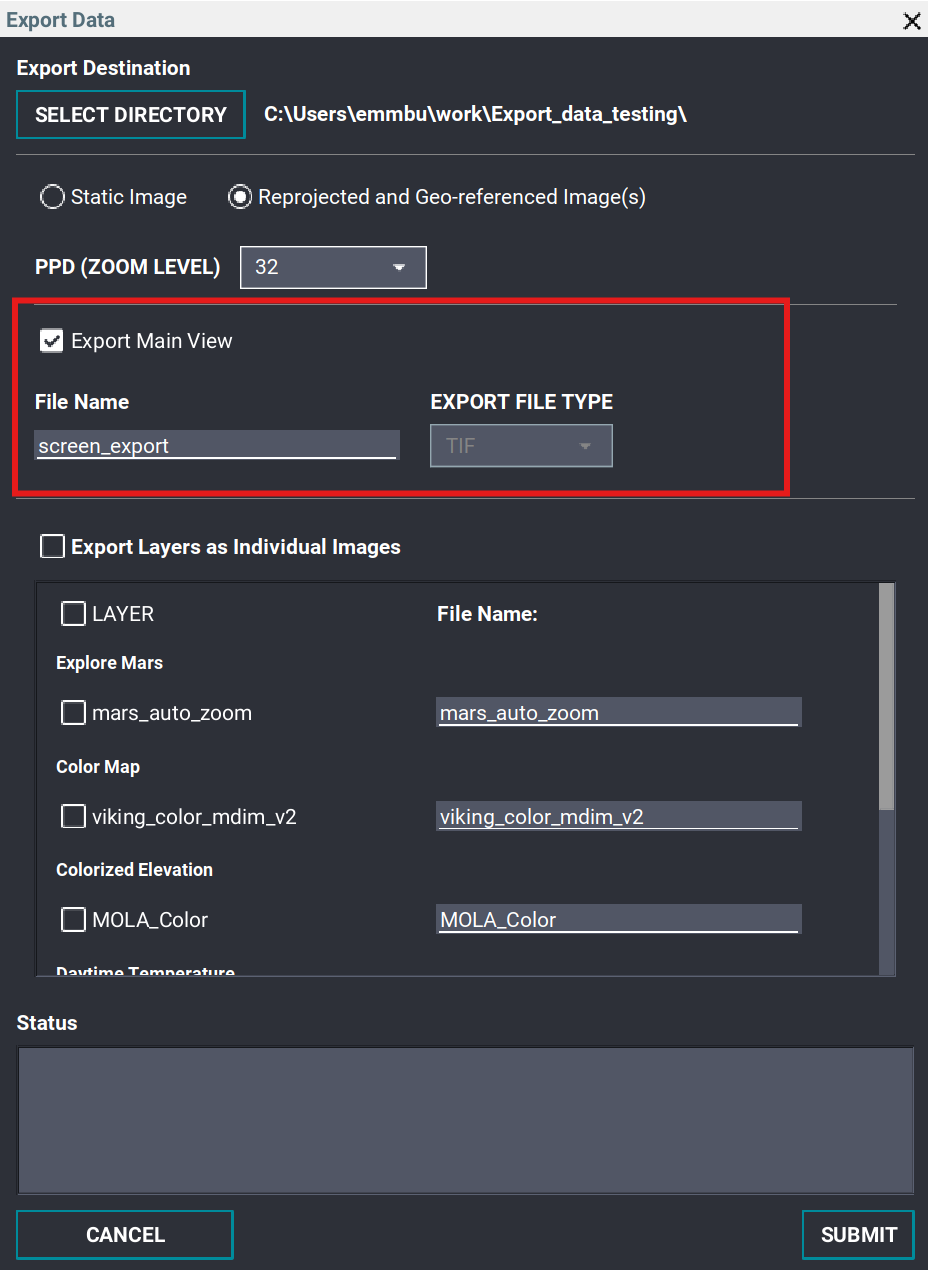
The example above shows Reprojected and Geo-referenced Image(s) selected for a Main View export.
Option 2: Export Individual Graphic Layers
- Select Export Layers as Individual Images.
- Select one or more graphic layers shown in the Layer Manager.
- Use the Layer checkbox to select or clear all available layers, or select the checkbox beside each individual layer you want to export.
- Keep the automatically generated file names or replace them with custom names.
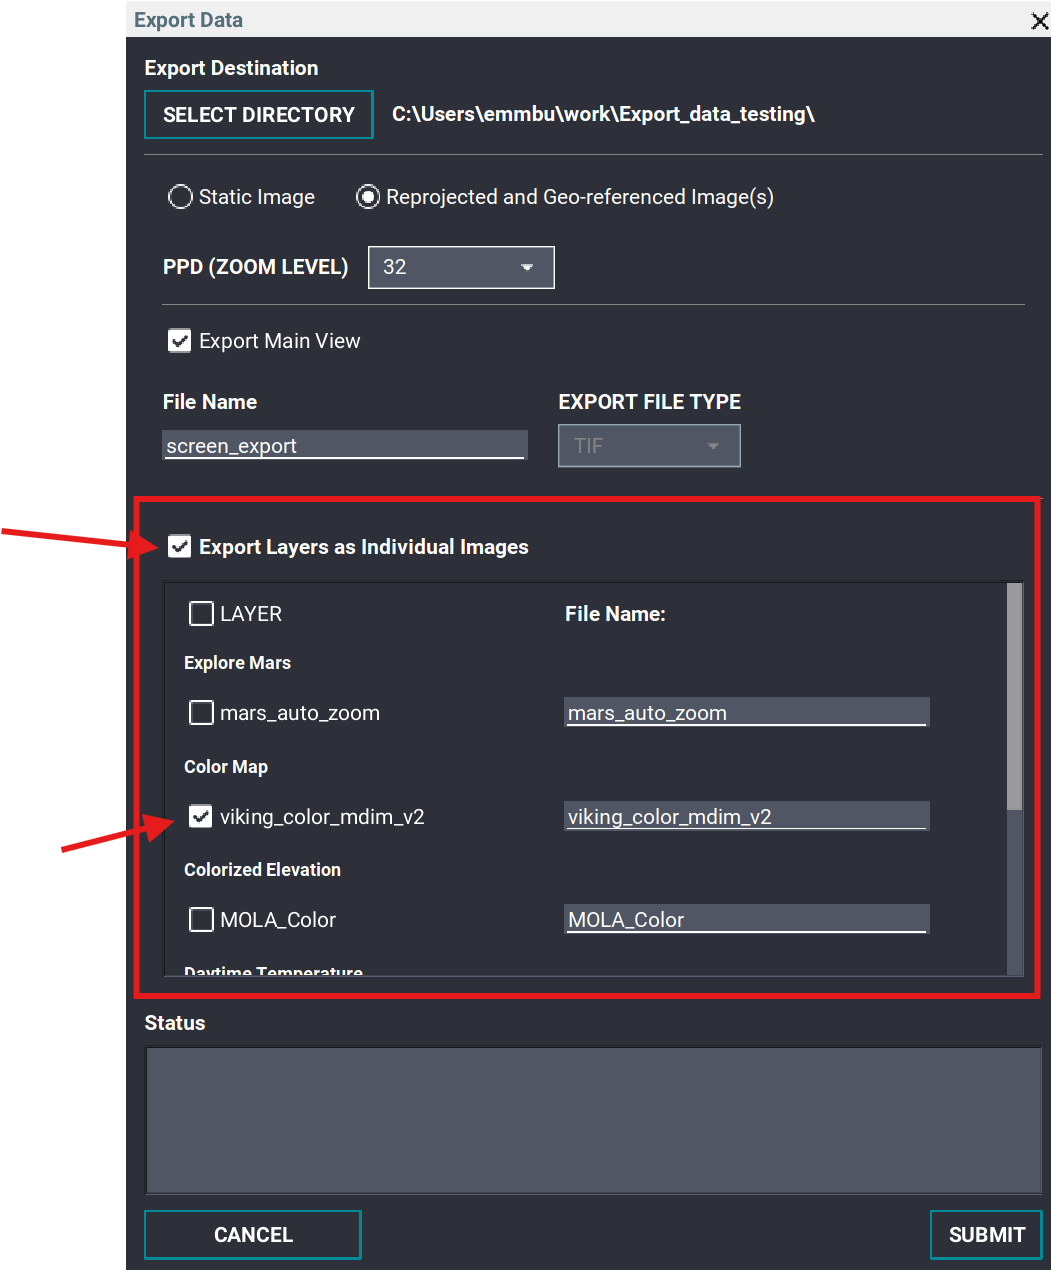
The example above shows Reprojected and Geo-referenced Image(s) selected while exporting individual graphic layers.
Submit the Export
After selecting the desired export options, click Submit.
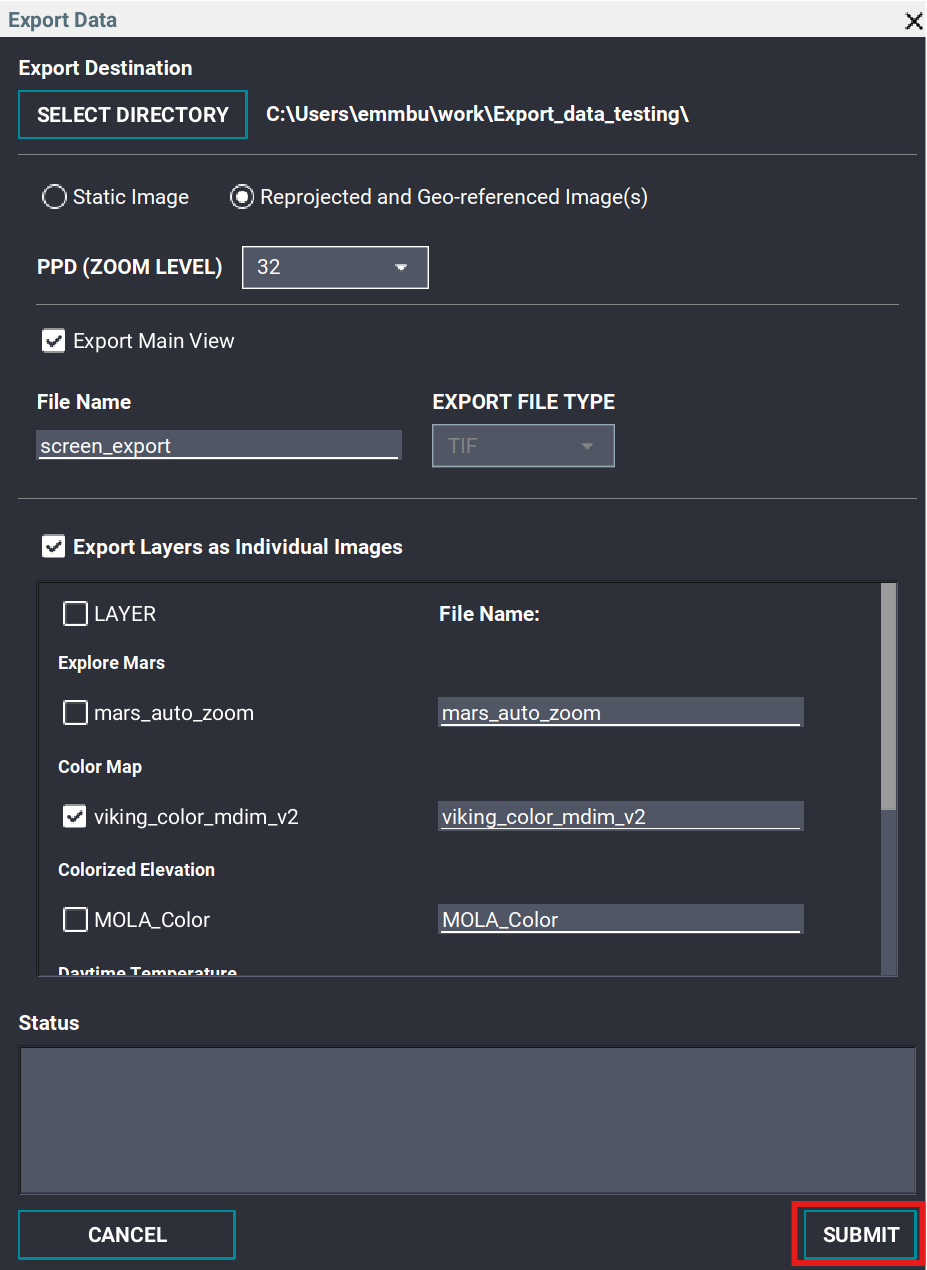
Monitor the Export Status
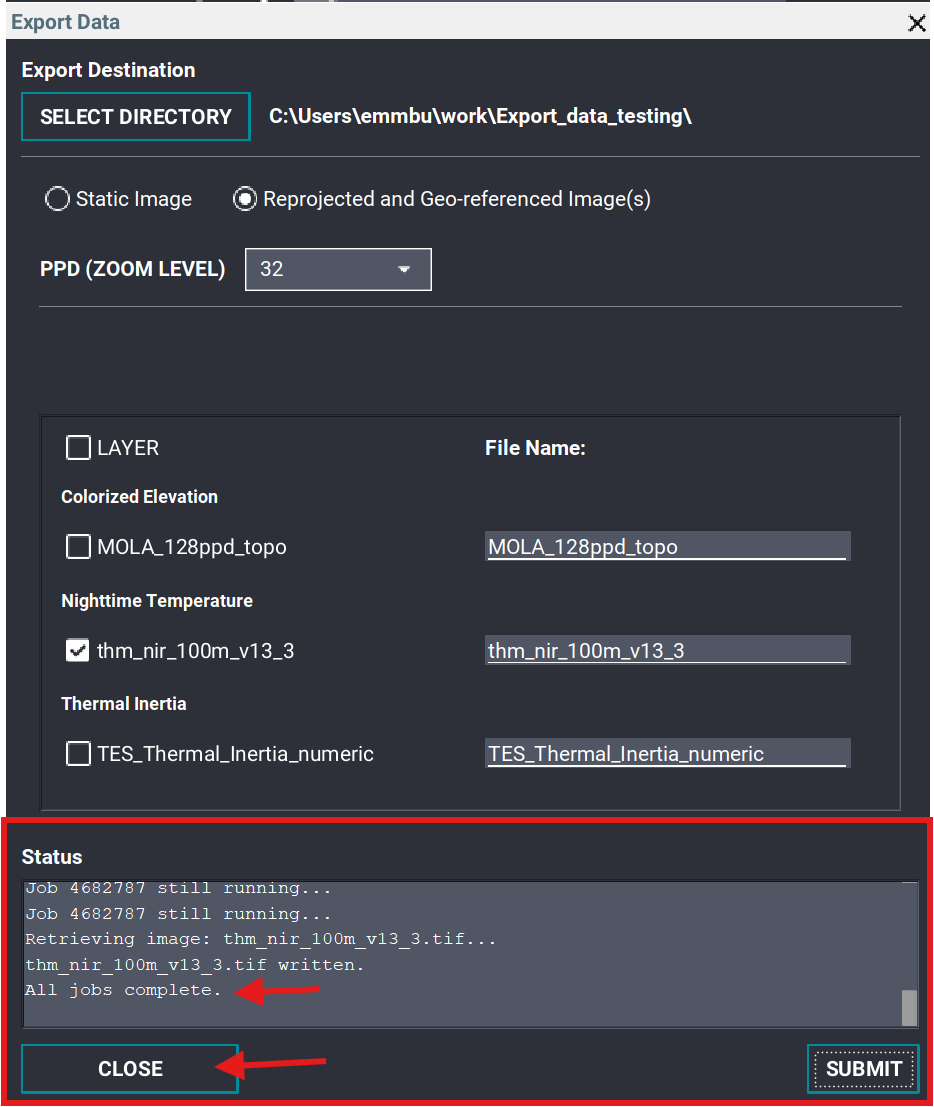
The Status box at the bottom of the window provides continuous updates while the images are being created. When processing is finished, the status displays All jobs complete, and the Cancel button changes to Close. Click Close to close the window.
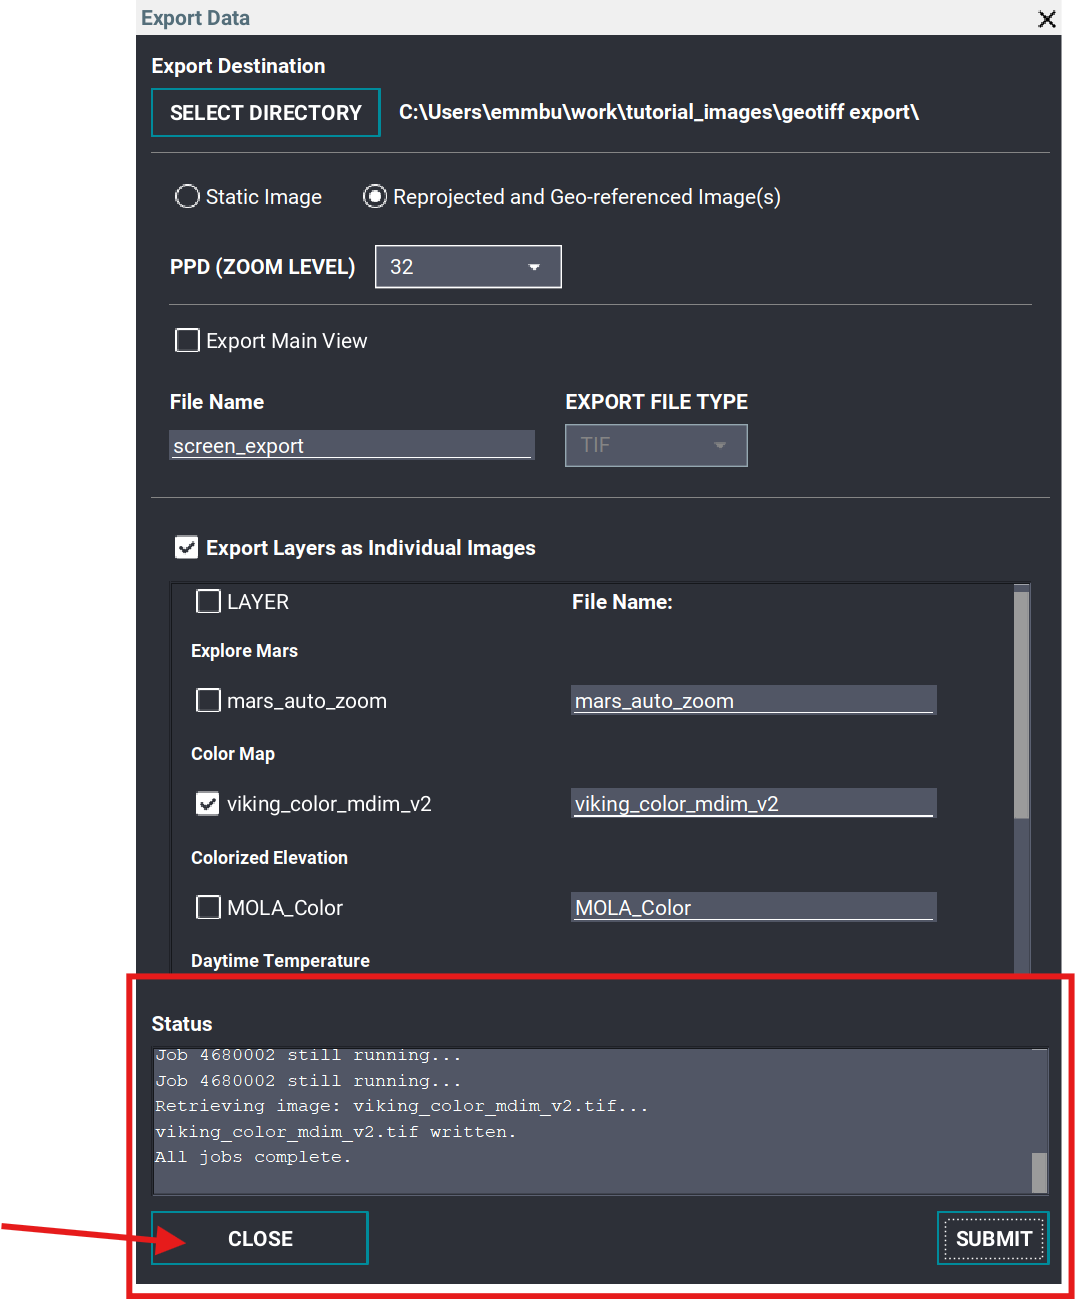
Export Numeric Data
Export Numeric Data saves selected numeric layers as individual images. The images can be exported with or without georeferencing.
-
Select File → New Export Options → Export Numeric Data.
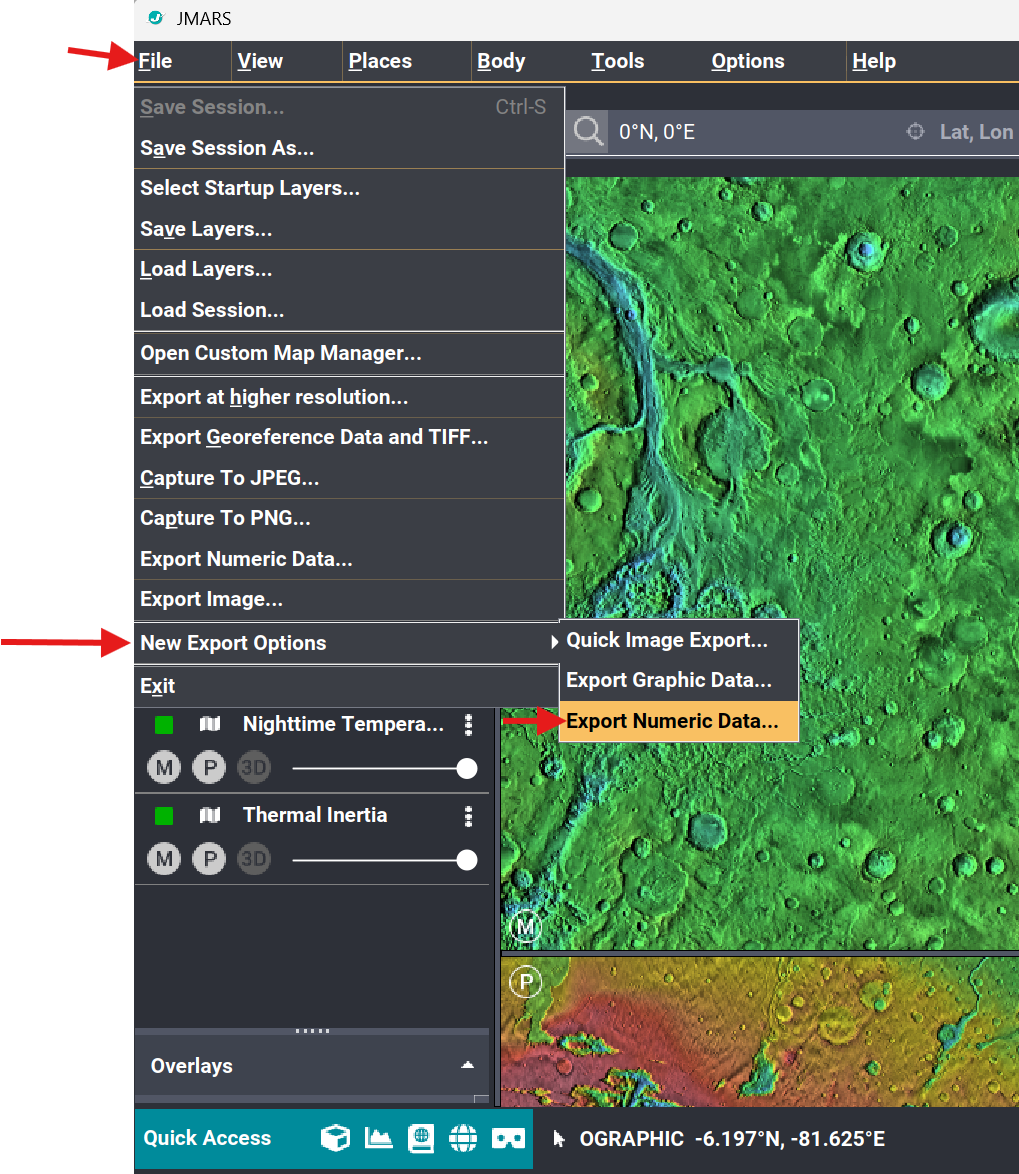
- When the Export Data window opens, click Select Directory and choose where the exported images will be saved.
-
Select an export type:
- Static Image: Exports each selected numeric layer as a standard image without projection or coordinate information. Select this option when the images are only needed for viewing, presentations, or documents.
- Reprojected and Geo-referenced Image(s): Reprojects each selected numeric layer and includes geographic information in the exported files. Select this option when the images will be opened in GIS software or imported as georeferenced maps.
For georeferenced numeric exports, mid-latitude images are reprojected to an Equirectangular projection. Images in the north and south polar regions are reprojected to a Polar Stereographic projection.
-
Choose the export resolution using PPD (Zoom Level). PPD means pixels per degree. It is initially set to match the Main View when the Export Data window opens, but it can be changed before exporting.
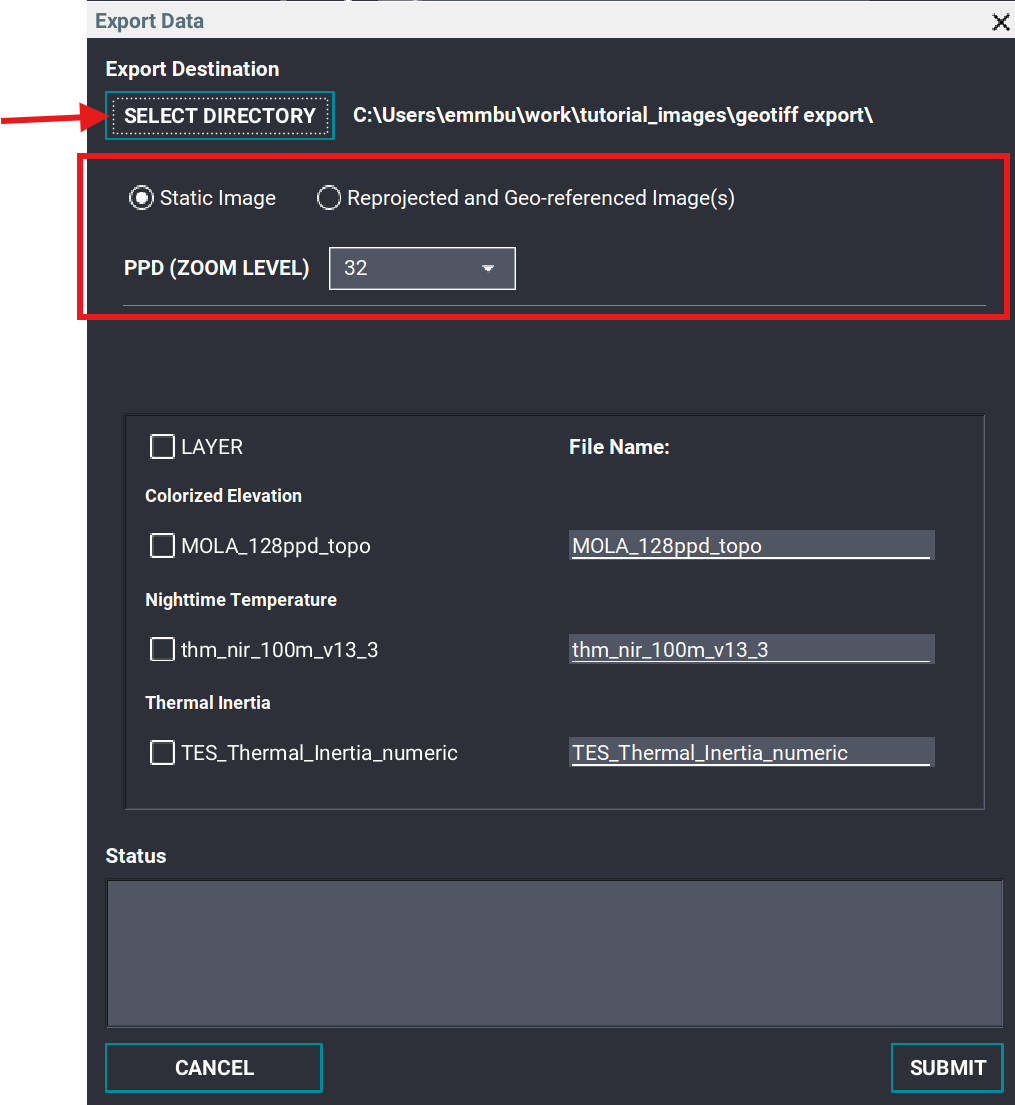
The example above shows Reprojected and Geo-referenced Image(s) selected.
-
Select one or more numeric layers to export.
- Use the Layer checkbox to select or clear all available numeric layers.
- To export specific layers, select the checkbox beside each layer you want to export.
- Keep the automatically generated file names or replace them with custom names.
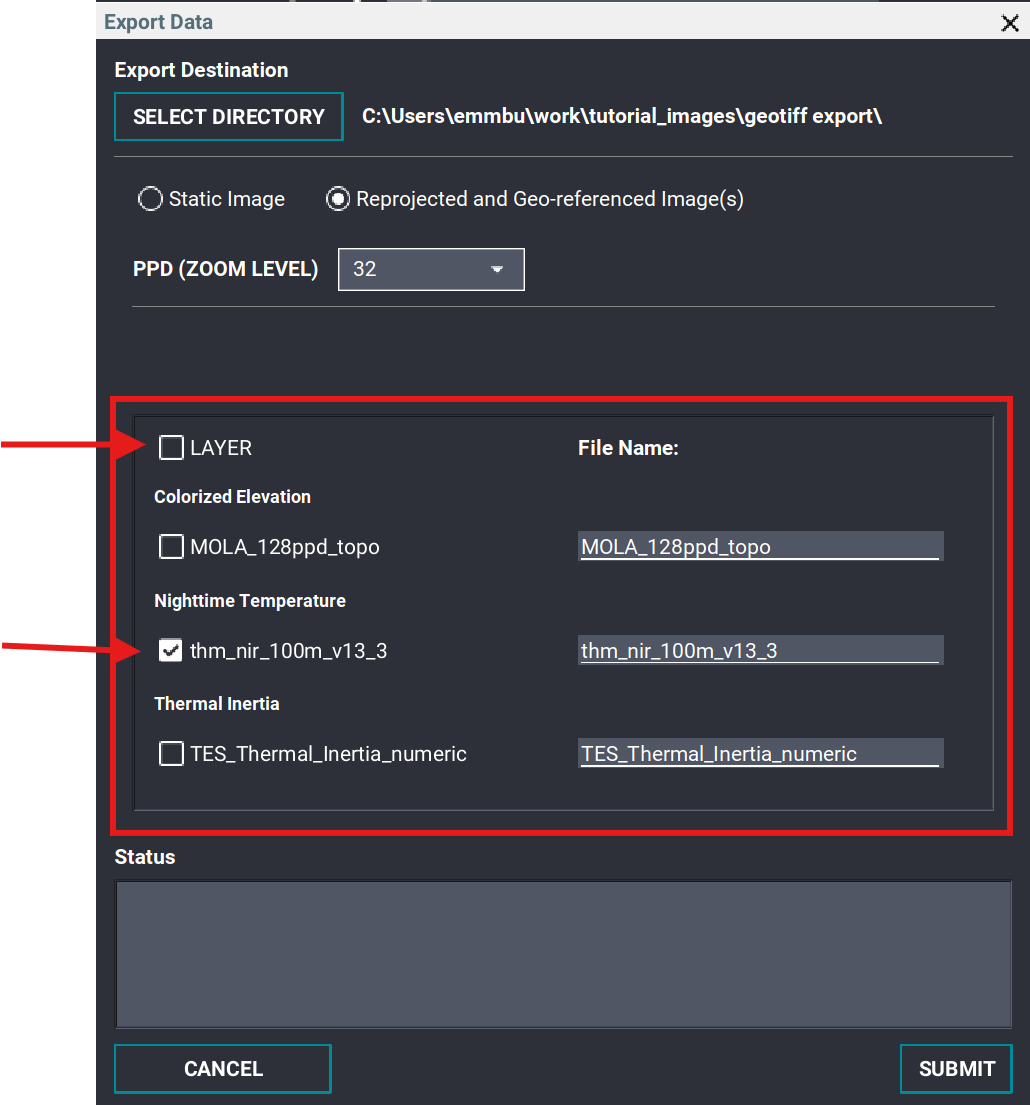
- Click Submit to begin the export.
Monitor the Numeric Export Status
The Status box provides updates while the selected layers are being processed. The Cancel button remains available while the export is running.
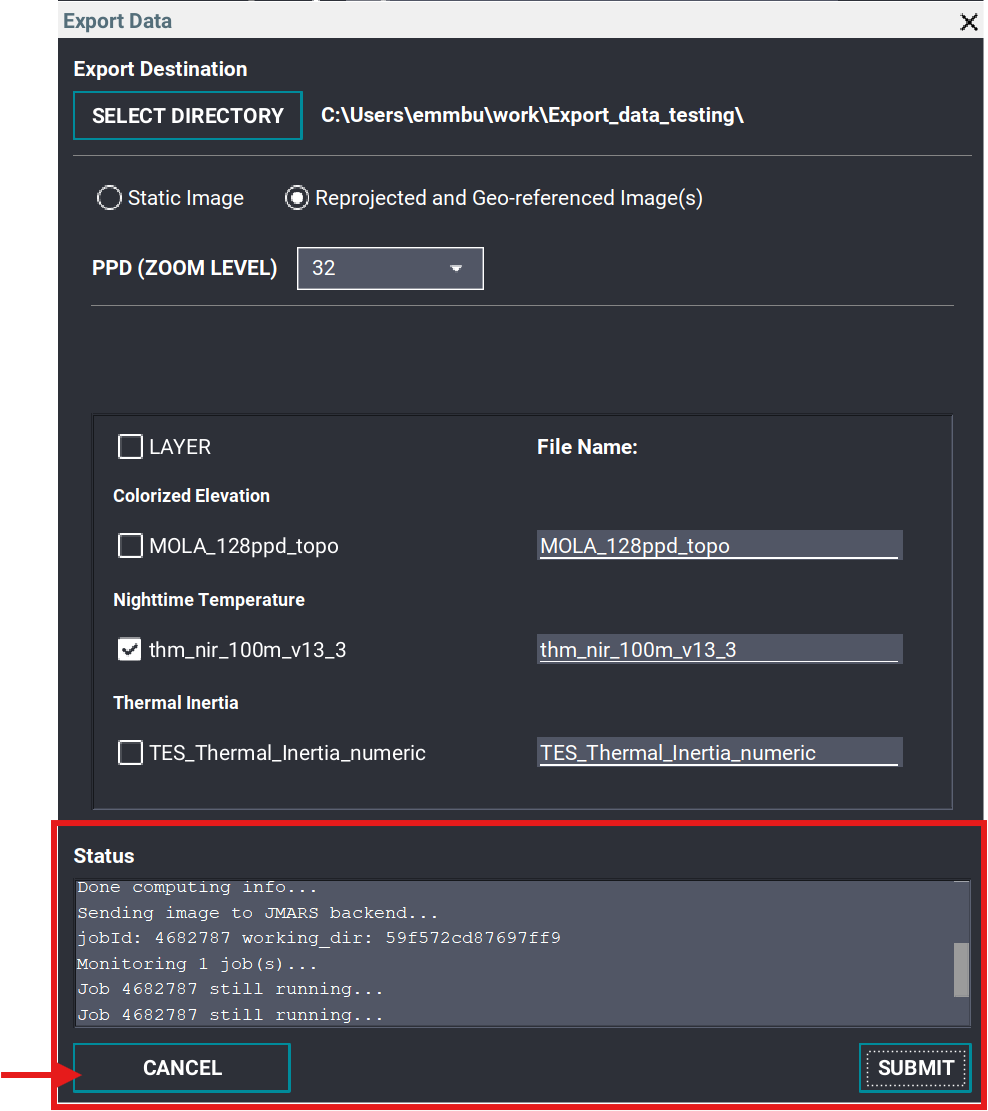
When processing is finished, the status displays All jobs complete, and the Cancel button changes to Close. Click Close to close the window.