
- Home
- Getting Started
- Documentation
- Release Notes
- Tour the Interface
- Tour the Layers
- JMARS Video Tutorials
- Lat/Lon Grid Layer
- Map Scalebar
- Nomenclature
- Crater Counting
- 3D
- Shape Layer
- Mosaics
- Map
- Advanced/Custom Maps
- Graphic/Numeric Maps
- Custom Map Sharing
- Stamp
- THEMIS
- MOC
- Viking
- CRISM Stamp Layer
- CTX
- HiRise
- HiRISE Anaglyph
- HiRISE DTM
- HRSC
- OMEGA
- Region of Interest
- TES
- THEMIS Planning
- Investigate Layer
- Landing Site Layer
- Tutorials
- Video Tutorials
- Displaying the Main View in 3D
- Finding THEMIS Observation Opportunities
- Submitting a THEMIS Region of Interest
- Loading a Custom Map
- Viewing TES Data in JMARS
- Using the Shape Layer
- Shape Layer: Intersect, Merge, and Subtract polygons from each other
- Shape Layer: Ellipse Drawing
- Shape Layer: Selecting a non-default column for circle-radius
- Shape Layer: Selecting a non-default column for fill-color
- Shape Layer: Add a Map Sampling Column
- Shape Layer: Adding a new color column based on the values of a radius column
- Shape Layer: Using Expressions
- Using JMARS for MSIP
- Introduction to SHARAD Radargrams
- Creating Numeric Maps
- Proxy/Firewall
- JMARS Shortcut Keys
- JMARS Data Submission
- FAQ
- Open Source
- References
- Social Media
- Podcasts/Demos
- Download JMARS
Region of Interest Layer
The Region of Interest (ROI) Layer, which is only available in the THEMIS release of JMARS, allows THEMIS science team members to specify areas of Mars they would like to observe with the THEMIS instrument. The ROIs serve as general imaging request that helps the mission planners to prioritize observations. If a science team member has a specific imaging request (ie. a very time-sensitive request), they should contact the mission planners to schedule the observation.
What is an ROI?
An ROI is a polygon accompanied by a description of the types of observations that should be collected in that region. Once entered, the ROIs can be designated as either "Online" or "Offline".
- Online ROIs are stored in the Mars Space Flight Facility database and are accessible to the owner and the mission planners, but not to other JMARS users.
- Offline ROIs are stored in an external file and are visible only to users who load the file. They are not visible to mission planners or to other JMARS users who do not have access to the file. Offline ROIs can be turned into Online ROIs using the ROI layer.
View Online ROIs
- Open the ROI Layer: In the Layer Manager, chose "Add New Layer" -> "ROI" -> "Online"
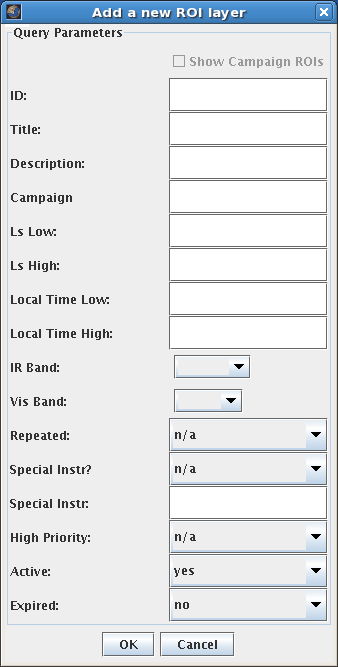
- Enter Search Parameters: Users will usually want to display all of the available ROIs, except possibly mission planners. However, if the user would like to narrow down the number of ROIs displayed, they can enter search parameters in the pop-up input box. Descriptions and allowable values for each field are given in the quick reference table below.
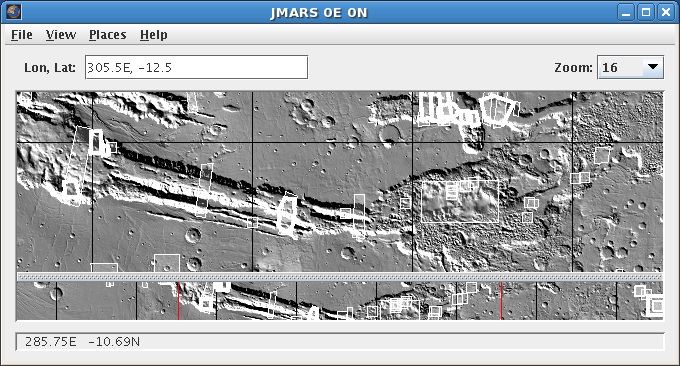
- Perform the ROI Search: Clicking "OK" will make the ROI Layer perform the search and display the results in the Viewing Window. Even if the search is for all available ROIs, the process is relatively quick. Once the ROIs are displayed, users can view their associated information through a mouse-over tooltip or can right-click on the outlines to edit them.
|
Filter Type |
Acceptable Values |
Description |
|
|
#### - Four-Digit ROI ID Number |
To find a specific ROI, the unique four-digit ROI ID number can be entered here. |
|
|
Any Text Title |
Users assign a title to each ROI, usually based on the target's name or the name of the imaging campaign requesting the observation. |
|
|
Any Text Description |
This field is left blank by default, but users can enter more detailed information about either the target or the imaging requirements. Please ONLY include information than can NOT be communicated through the ROI's menu options. This will aid the future development of automated targeting software. |
|
|
Any Imaging Campaign Name |
This field is left blank by default. If the ROI is requesting observations on behalf of an established THEMIS imaging campaign, users can enter the name of the campaign. All other THEMIS team members who know the name of the campaign will be able to view these ROIs, which should make collaboration easier. |
|
|
0 - 360 |
This is the best way to search for ROIs that are season-specific. Note that a given solar longitude (Ls) will indicate different seasons in the Northern and Southern hemispheres and that some ROIs might not be season-specific. |
|
|
0.00 - 24.00 |
This field allows the user to search for ROIs that request images at specific times of day. Since Mars Odyssey is in an orbit with a near-constant local time there will be very little variation except around the poles. If a science team members needs to request observations at specific local times, they should speak with the mission planners.. |
|
|
CAL - Band 10 |
The THEMIS IR camera has ten bands. By default, "daytime" IR observations are taken on the descending (sun-facing) side of the orbit with all ten bands while "nighttime" IR observations are taken on the ascending (non-sun-facing) side of the orbit with only bands 4,9 and 10. |
|
|
Bands 2,3,4,5 |
The THEMIS VIS camera has five bands, but the vast majority of VIS images only use band 3, the red band. The "All" option is also rarely used since experience has shown that band 1 observations are usually obscured by atmospheric effects. |
|
|
Yes |
This option allows the user to specify if observations should be repeated or if a single observation of the ROI is sufficient. If a repeated observation is required, the frequency of the observations is usually put in the "Special Instructions" section. |
|
|
Yes |
Enables/Disables the addition of text to the "Special Instructions" box. |
|
|
Any Text Instructions |
This field allows users to enter any unusual observation requirements, specifically those that can not be communicated to the mission planners through the available drop-down menu options. |
|
|
Yes |
Some ROIs are given a higher priority so that mission planners can more easily make decisions regarding which regions to image. Only mission planners can designate an ROI as "High Priority" so other users won't need this option. |
|
|
Yes |
Users can designate their ROIs as either "Active" or "Inactive". Users should change any ROIs that won't be needed for a long time to "Inactive" status to help the mission planners sort through the ROIs that do need to be covered at any given time. Inactive ROIs remain in the database and can be reactivated by the owner at any time. |
|
|
Yes |
Users must now designate an expiration date for their ROIs. This could be anything from the end of a Martian season (in Earth dates) to their expected graduation dates. When the ROI expires, it is listed as "Expired" in the database and is no longer visible to the mission planners, but is not deleted from the database and can be reactivated by the user at any time. |
View Offline ROIs
- Open the ROI Layer: Chose "Add New Layer" -> "ROI" -> "Offline"
- Open an ROI File: Locate an Offline ROI file from a previous session and click "Open". The Offline ROIs will then be displayed in the Viewing Window.
ROI Layer Functions
The functions of the ROI Layer can be accessed by clicking on the "ROI Layer" tab in the Layer Manager. Users can then choose from two tabs inside the ROI Layer: the "Data" tab and the "Settings" tab.
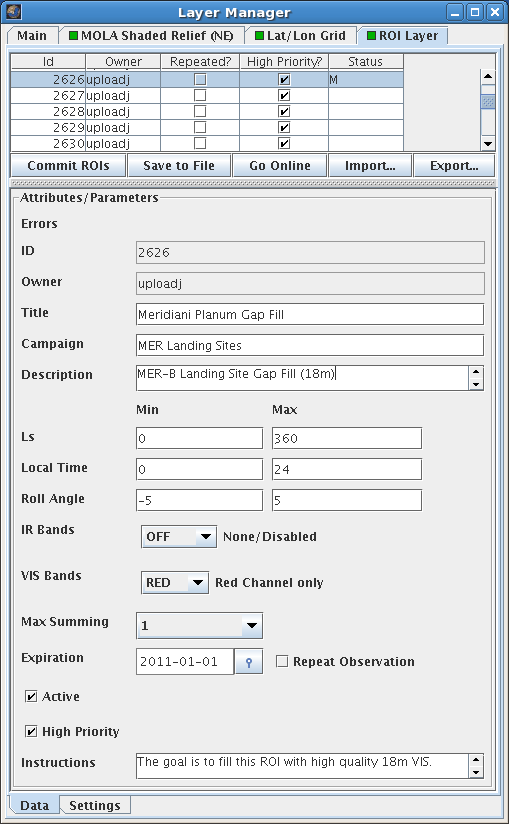
- Data Tab
- ROI List: All ROIs found by the ROI Layer during the initial search are displayed in this list. These ROIs can be sorted according to any of the fields by clicking on the column titles. Double-clicking on an entry will also recenter the Main and Panner Views on the selected ROI.
- ROI Buttons: The four buttons below the ROI list allow the user to save or access ROIs.
- The "Commit ROIs" button will save any new or edited ROIs to the MSFF ROI database.
- The "Save to File" button will save the selected ROIs to an Offline ROI file.
- The "Go Online" button will connect the ROI Layer to the ROI database, which usually occurs automatically when the layer is opened.
- The "Import ROIs" button will allow users to load an existing Offline ROI file.
- ROI Attributes & Parameters: When the user clicks on an ROI displayed in the Viewing Window, the various parameters associated with the ROI are displayed in this section. (These are the same fields described in the table above.)
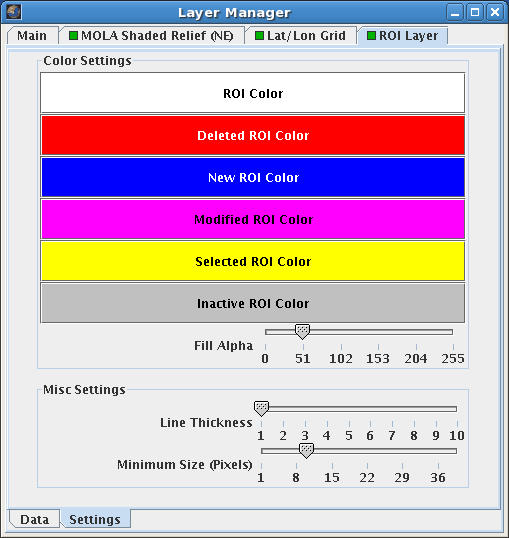
- Settings Tab
- Color Settings: Users can change the colors of ROIs based on their states (Regular, Deleted, New, Modified, Selected or Inactive). Users can also adjusted the Fill Alpha using the slider.
- Misc Settings: Users can adjust the ROI outline thickness and the minimum pixel size, which is very helpful when viewing small ROIs while zoomed out.
Creating an ROI
- Change to Add Mode: With the ROI Layer open, right-click in the Main View and chose "Add Mode".
- Draw ROI Box: Left-click to place the corners of the ROI polygon on the map. When more than one point has been placed, a line will be drawn between the points. To close the polygon, the last point should be placed on top of the first point. Then the "Attributes and Parameters" section of the ROI Layer tab will become active and values can be entered.
- Enter ROI Parameters: Enter values for all of the ROI parameters that are relevent.(This will now be strictly enforced in order to make the ROI Layer more efficient for all users. If you are unsure about how to fill out one of the fields, please email either help@jmars.asu.edu or planners@mars.asu.edu. The mission planners will contact users if they need to make changes to their existing ROIs.)
- Commit ROI: When all the edits are done, click the "Commit ROIs" button to commit the changes to the MSFF ROI database. The new ROI should change to white.
- Verify Addition: To check that the ROI was properly added to the database, mouse-over the new ROI in the Viewing Window and verify the associated parameters are displayed correctly in the tooltip.
Editing an ROI
- Select an ROI: With the ROI Layer open, select an ROI in the Viewing Window with a left-click.
- 'View ROI Parameters: In the ROI Layer tab of the Layer Manager, the parameters of the selected ROI are displayed in the "Attributes and Parameters" Section.
- Edit ROI Parameters: Edit any of the values or text.
- Edit ROI Dimensions: To edit the dimensions or shape of the ROI box in the Viewing Window, left-click on a corner point and drag it to the desired location.
- Commit ROI: When all edits are done, click the "Commit ROIs" button to commit the changes to the database. The ROI should change to white.
- Verify Edits: To check that the changes were made properly, mouse-over the ROI in the Viewing Window and verify that the new parameters are displayed in the tooltip.


Related Pages
- Tutorial #4: Submitting a THEMIS Region of Interest (ROI)