
The Layer Manager displays the open layers in the order which they are “stacked” in the Viewing Window. The Layer Manager opens in a separate window so users can view both the Viewing Window and the Layer Manager at the same time and can adjust their sizes independently.
- To Add a Layer: Click on the "Add New Layer" button, which will give you a directory of available layers. (Each of these layers is described in the "Tour of the JMARS Layers" section on the main page.)
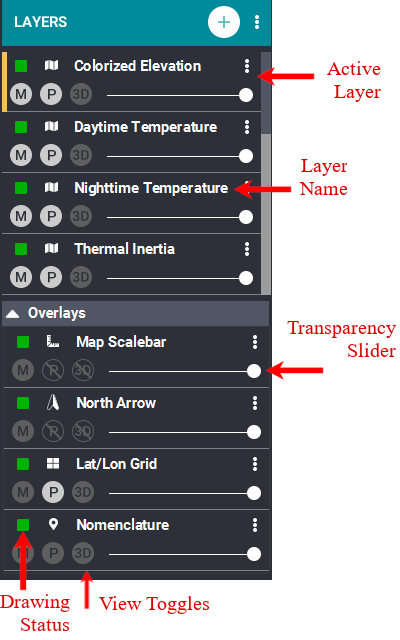
- To Remove a Layer: The user can either highlight a layer and click the "Delete Layer" button or, to simply prevent JMARS from displaying the layer, click on either the "M" or "P" buttons to the left of the layer name. This will remove the layer from either the Main View or the Panner View, respectively.
- To Adjust the Transparency of a Layer: Use the slide bar to the right of the layer name. By default, each layer is set to zero transparency, but can be adjusted to the user's preference.
- Overlays: Are the default cartography layers. The layers are the Map Scalebar, North Arrow, Lat/Lon Grid, and Nomenclature.
- Toggle Buttons: The "M" indicates Main View. The "P" indicates Panner View and the "3D" indicates the 3D Layer. If the button is turned off, the layer will not show.
- Shortcuts: The three dots on any layer is the shortcuts to other layers. Some of the shortcuts are the Custom Shape Layer, Custom Maps Manager, Favorites and more.
- "+": The plus button next to "LAYERS" opens the Layer Manager. Use this to add additional layers.
The various parameters associated with each layer can be changed by double clicking on the layer Layer, which will display the appropriate layer's focus panel. The options available for each layer are discussed in the layer description pages, which are listed under "Tour of the JMARS Layers" section on the main page.
In order to interact with some layers in Viewing Window, such as the THEMIS Planning layer, they must be selected as the "active" layer in the Layer Manager. This is done by clicking on the layer and is confirmed by a blue outline. The functions that are only enabled when a given layer is "active" are also discussed in the layer description pages.
Some JMARS layers require a large amount of data in order to function, which means it can take a long time for JMARS to load the layer in the Viewing Window. The status of each newly added or edited layer is given by the Drawing Status buttons. Green indicates the layer is fully drawn, Yellow indicates that the layer is being drawn and Red indicates the layer is still retrieving data from the database. An Orange or Red box indicates that an error has occurred, in which case the user can refresh the layers by panning slightly in any direction.