
- Home
- Getting Started
- Documentation
- Release Notes
- Tour the Interface
- Tour the Layers
- JMARS Video Tutorials
- Lat/Lon Grid Layer
- Map Scalebar
- Nomenclature
- Crater Counting
- 3D
- Shape Layer
- Mosaics
- Map
- Advanced/Custom Maps
- Graphic/Numeric Maps
- Custom Map Sharing
- Stamp
- THEMIS
- MOC
- Viking
- CRISM Stamp Layer
- CTX
- HiRise
- HiRISE Anaglyph
- HiRISE DTM
- HRSC
- OMEGA
- Region of Interest
- TES
- THEMIS Planning
- Investigate Layer
- Landing Site Layer
- Tutorials
- Video Tutorials
- Displaying the Main View in 3D
- Finding THEMIS Observation Opportunities
- Submitting a THEMIS Region of Interest
- Loading a Custom Map
- Viewing TES Data in JMARS
- Using the Shape Layer
- Shape Layer: Intersect, Merge, and Subtract polygons from each other
- Shape Layer: Ellipse Drawing
- Shape Layer: Selecting a non-default column for circle-radius
- Shape Layer: Selecting a non-default column for fill-color
- Shape Layer: Add a Map Sampling Column
- Shape Layer: Adding a new color column based on the values of a radius column
- Shape Layer: Using Expressions
- Using JMARS for MSIP
- Introduction to SHARAD Radargrams
- Creating Numeric Maps
- Proxy/Firewall
- JMARS Shortcut Keys
- JMARS Data Submission
- FAQ
- Open Source
- References
- Social Media
- Podcasts/Demos
- Download JMARS
Stamp Layer
The Stamp Layer displays the outlines of observations made by various orbital instruments. Users can see where observations have been acquired and then load only those they wish to view, which is much faster than attempting to load all observations from a given instrument.
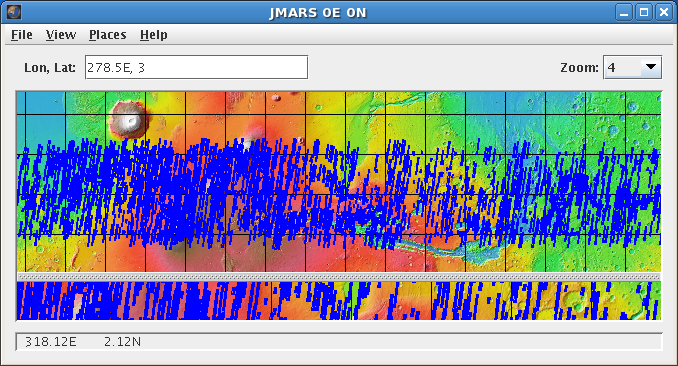
Stamp Layer Functions
Stamps can be opened by either adding a new layer or through Advanced Maps. Through the add a new layer, go to the layer manager click "Add New Layer" -> change the category to "Imagery" and expand "Image Sets". The functions of the Stamp Layer can be accessed by double clicking on the Stamp Layer that you added in the Layer Manager. It contains the following six function tabs.
- Outlines Tab
- Once a search has been completed, basic information associated with each stamp appears in a table in the Outlines Tab. Clicking on an entry in this table will highlight the associated stamp in the Viewing Window and vice versa. To find a specific stamp, users can click on the "Find Stamp" button and enter the image id of the stamp they are looking for. Users can also highlight entries and copy them to other programs or send the entire table to a tab delimited text file by clicking on the "Dump Table to File" button.

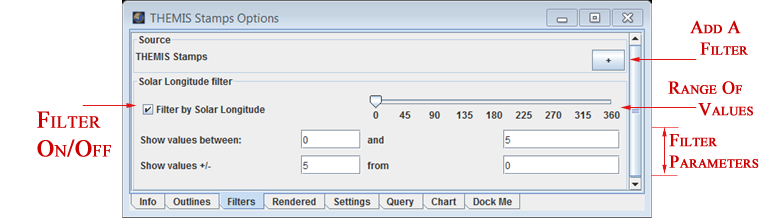
- Filters Tab: The Filters Tab allows users to view the results of their stamp search through a number of dynamic secondary filters. To use one of the secondary filters:
- Open a Filter: Click on the "+" button, select the parameter(s) to use as the secondary filter and click "OK".
- Activate the Filter: In the newly-opened filter box in the focus panel, check the "Filter by..." checkbox.
- Set Filter Size: Users need to input what range of values to allow through this secondary filter by either entering sample min/max values under "Show Values Between..." or by entering "+/-" values, relative to the current value, under "Show Values +/-...".
- Using the Filter: The slide bar in the filter box will display the minimum and maximum acceptable values for the chosen parameter. The Viewing Window will show all stamps from the previous search that fall within the sample filter range entered in the previous step. By moving the slide bar, users can dynamically view the stamps that fall within their continously-changing filter values.
- Reasons for Using the Filter Tab: Many users find it useful to view how many stamps from their search results make it through the secondary filter as the filter parameter, such as solar longitude, time-of-day, orbit, etc are changed.
- Rendered Tab: The Rendered Tab controls the display of image data within stamps selected by the user.
- Image List Functions: The Image List function buttons at the top of the Rendered Tab can be used to import pre-built stamp lists, copy the image IDs of selected rendered images and sort rendered images from left-to-right.
- Image Display Preferences: Using the check boxes at the top-left, users can hide the outlines of rendered stamps and set the Stamp Layer to only display the rendered stamps that have been selected in the available list.
- Image Ordering: The rendered stamps in the Viewing Window are stacked on top of each other much like layers are stacked on top of each other in the Layer Manager. The user can raise or lower rendered stamps with respect to others, send them directly to the top or bottom of the list or unrender them using the "Delete" button.
- Stamp Offsets: If the rendered stamps in the Viewing Window do not match up perfectly with the underlying terrain, users can shift them using the offset buttons. The arrow buttons indicate the direction of the offset and the center number button indicates the number of pixels to offset (1,2,5 or 10) per click of the direction buttons.Keep in mind that JMARS will save the offset after several seconds. If you don't want to save the offset that you have set, press the "Reset Offset" button.
- Image Contrast: The contrast of the rendered images can be adjusted using the slider at the bottom of the page, although this is rarely necessary. Users can also change the color scale used for displayed the rendered images using the "Copy", "Paste", "Swap" and "Auto" buttons.
- Rendering Different Image Types: The new THEMIS Stamp Layer allows users to render IR images as either Brightness Temperature Records (BTRs), Projected Brightness Temperature Recrods (PBTs) and De-Correlation Streches (DCSs). The BTRs can be rendered for all existing IR images, but the PBTs and DCSs are not yet available for all images. Please visit the
page to see which orbits ranges currently have PBTs and DCSs available. - Getting IR Image Temperatures: When an IR image's BTR has been rendered, users can get pixel-by-pixel temperature values by hovering their mouse cursor over the rendered image when the investigate tool is selected.

- Settings Tab: The Settings Tab controls the display of the stamp outlines in the Viewing Window.

- Stamp Appearance: Users can can change the color of the stamp outline and the stamp fill color using the drop-down menus at the top. The transparency of the stamp fill color is automatically set to zero, but can be adjusted using the slide bar.
- Layer Name: The name of the Stamp Layer in the Layer Manager is displayed and can be changed by editing the text and hitting "Enter".
- Customize Web Browser: The stamp layer uses a web browser when users right-click on a stamp in the Viewing Window and chose to "Web-Browse" an image. The default web browser is Firefox, but can be changed using this option.
- Query Tab: The Query Tab is identical to the search screen that appears when opening the Stamp Layer and is used to change the search parameters for additional image searches.

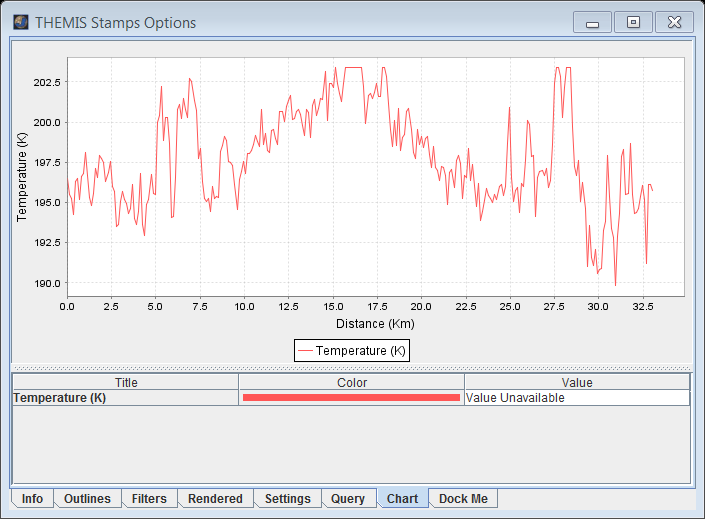
- Chart Tab:The Chart Tab allows users to quickly plot numeric values associated with stamps that have been rendered. For example, when users render THEMIS BTRs (Brightness Temperature Records) the numeric temperature values are available on the tool tip. However, these values can also be plotted along a profile line using this tab.
- Render a Stamp with Numeric Values: In order to make a plot, users must first render a stamp that contains numeric information. Currently, the only THEMIS products with embedded numeric data are infrared BTRs and PBTs. Many other instruments also have products with embedded numeric data, such as HIRise DTMs and HRSC DT4s
- Draw a Profile Line: Users must draw a profile line along which values from the rendered image will be plotted. To draw the line hold down the "Shift" key and click to begin a line, use additional single clicks to add points to the line and double-click to end the line.
- View Plot: The plot of the numeric stamp values along the profile line will be displayed in the plot window of the Chart Tab. If users attempt to draw a profile line on a rendered stamp that does not have numeric data associated with it, the plot window will remain empty.
- The Stamp Layer interface is basically the same for all instruments. The minor differences in the Stamp Layers for the all the instruments, which are explained on the appropriate Stamp Layer pages below, are due to the unique characteristics of the instruments and the data they produce.


Thermal Emission Imaging System (THEMIS) Stamp Layer
The THEMIS Stamp Layer will display stamps for all observations, both VIS and IR, acquired by the THEMIS camera onboard the Mars Odyssey spaecraft. Since the THEMIS dataset is so large, there are numerous search parameters that allow users to restrict their search to only the types of observations they are interested in viewing.
Mars Orbital Camera (MOC) Stamp Layer
The MOC Stamp Layer will display stamps for all images, both narrow-angle and wide-angle, acquired by the Mars Orbital Camera (MOC) onboard Mars Global Surveyor. While the search interface is similar to the THEMIS Stamp Layer, there are some differences that allow users to search for images based on the unique parameters associated with MOC images.
Viking Camera Stamp Layer
The Viking Camera Stamp Layer will display stamps for all images acquired by the Visible Imaging Subsystem (VIS) onboard the Viking 1 & 2 orbiters. While the search interface is similar to the THEMIS Stamp Layer, there are some differences that allow users to search for images based on the unique parameters associated with Viking VIS images.
Context Camera (CTX) Stamp Layer
The CTX Stamp Layer will display stamps for all images acquired by the Context Camera (CTX) aboard the Mars Reconnaissance Orbiter. While the search interface is similar to the THEMIS Stamp Layer, there are some differences that allow users to search for images based on the unique parameters associated with CTX images.
High Resolution Imaging Science Experiment (HiRISE) Stamp Layer
The HiRISE Stamp Layer will display stamps for all images acquired by the High Resolution Imaging Science Experiment (HiRISE) onboard the Mars Reconnaissance Orbiter. While the search interface is similar to the THEMIS Stamp Layer, there are some differences that allow users to search for images based on the unique parameters associated with HiRISE images.
High Resolution Imaging Science Experiment (HiRISE) Anaglyph Stamp Layer
The HiRISE Anaglyph Stamp Layer will display stamps for all anaglyph products produced by the High Resolution Imaging Science Experiment (HiRISE) science team. While the search interface is similar to the THEMIS Stamp Layer, there are some differences that allow users to search for HiRISE anaglyph products based on the unique parameters associated with both HiRISE images and anaglyph products.
High Resolution Imaging Science Experiment (HiRISE) DTM Stamp Layer
The HiRISE DTM Stamp Layer will display stamps for all DTM (digital terrain model) products produced by the High Resolution Imaging Science Experiment (HiRISE) science team. While the search interface is similar to the THEMIS Stamp Layer, there are some differences that allow users to search for HiRISE DTM products based on the unique parameters associated with both HiRISE images and DTM products.
High Resolution Stereo Camera (HRSC) Stamp Layer
The HRSC Stamp Layer will display stamps for all of the images acquired by the High Resolution Stereo Camera (HRSC) onboard the European Space Agency's Mars Express orbiter. While the search interface is similar to the THEMIS Stamp Layer, there are some differences that allow users to search for images based on the unique parameters associated with HRSC images.
Compact Reconnaissance Imaging Spectrometer for Mars (CRISM) Stamp Layer
The CRISM Stamp Layer will display stamps for all observations acquired by the Compact Reconnaissance Imaging Spectrometer for Mars (CRISM) onboard the Mars Reconnaissance Orbiter. While the search interface is similar to the THEMIS Stamp Layer, there are some differences that allow users to search for observations based on the unique parameters associated with CRISM observations.
Visible and Infrared Mineralogical Mapping Spectrometer (OMEGA) Stamp Layer
The OMEGA Stamp Layer will display stamps for all observations acquired by the Visible and Infrared Mineralogical Mapping Spectrometer (OMEGA) aboard the European Space Agency's Mars Express orbiter. While the search interface is similar to the THEMIS Stamp Layer, there are some differences that allow users to search for observations based on the unique parameters associated with OMEGA observations.