
- Home
- Getting Started
- Documentation
- Release Notes
- Tour the Interface
- Tour the Layers
- JMARS Video Tutorials
- Lat/Lon Grid Layer
- Map Scalebar
- Nomenclature
- Crater Counting
- 3D
- Shape Layer
- Mosaics
- Map
- Advanced/Custom Maps
- Graphic/Numeric Maps
- Custom Map Sharing
- Stamp
- THEMIS
- MOC
- Viking
- CRISM Stamp Layer
- CTX
- HiRise
- HiRISE Anaglyph
- HiRISE DTM
- HRSC
- OMEGA
- Region of Interest
- TES
- THEMIS Planning
- Investigate Layer
- Landing Site Layer
- Tutorials
- Video Tutorials
- Displaying the Main View in 3D
- Finding THEMIS Observation Opportunities
- Submitting a THEMIS Region of Interest
- Loading a Custom Map
- Viewing TES Data in JMARS
- Using the Shape Layer
- Shape Layer: Intersect, Merge, and Subtract polygons from each other
- Shape Layer: Ellipse Drawing
- Shape Layer: Selecting a non-default column for circle-radius
- Shape Layer: Selecting a non-default column for fill-color
- Shape Layer: Add a Map Sampling Column
- Shape Layer: Adding a new color column based on the values of a radius column
- Shape Layer: Using Expressions
- Using JMARS for MSIP
- Introduction to SHARAD Radargrams
- Creating Numeric Maps
- Proxy/Firewall
- JMARS Shortcut Keys
- JMARS Data Submission
- FAQ
- Open Source
- References
- Social Media
- Podcasts/Demos
- Download JMARS
Submitting a THEMIS Region of Interest (ROI)
The purpose of this tutorial is to walk users through the process of opening JMARS, navigating to the northwest end of Ares Vallis using the Nomenclature Layer, using the Stamp Layer to determine 18m VIS coverage, loading the ROI Layer and entering an ROI to complete 18m VIS coverage of the region. The ROI Layer is only available in the THEMIS Team Release, which will be used for this tutorial.
Step 1: Openning JMARS
- Double-click the JMARS Icon on your Desktop
- Enter your JMARS user name and password. If you do not have a user name and password, register for a new account
on the JMARS Homepage.
- At this point, the Layer Manager should only have the MOLA Shaded Relief Layer and the Lat/Lon Layer loaded.
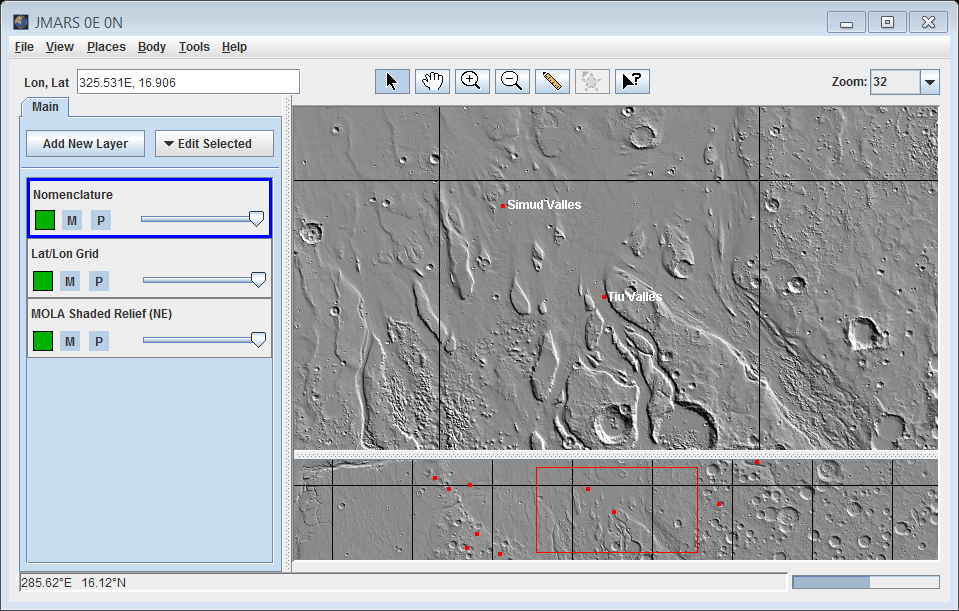
Step 2: Navigating to the northwest end of Ares Vallis Using the Nomenclature Layer
- In the Layer Manager, click "Add New Layer" -> "Nomenclature". Then double-click on the "Nomenclature" tab to see the layer's focus panel.
- In the "Selected Landmarks" section, select "Vallis
- In the "Navigation" section, "Vallis" should be listed under "Landmark Type". Locate and select "Ares Vallis" in the "Landmark" drop-down box. Then click "Goto". The Viewing Window will recenter on Ares Vallis.
- By center-clicking and dragging, navigate to the northwest (upper-left) end of Ares Vallis.

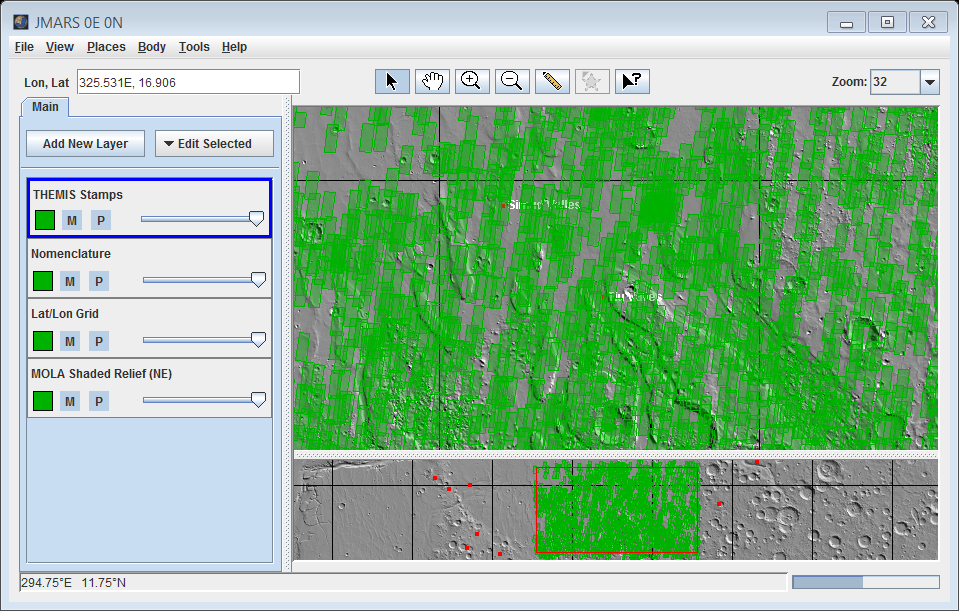
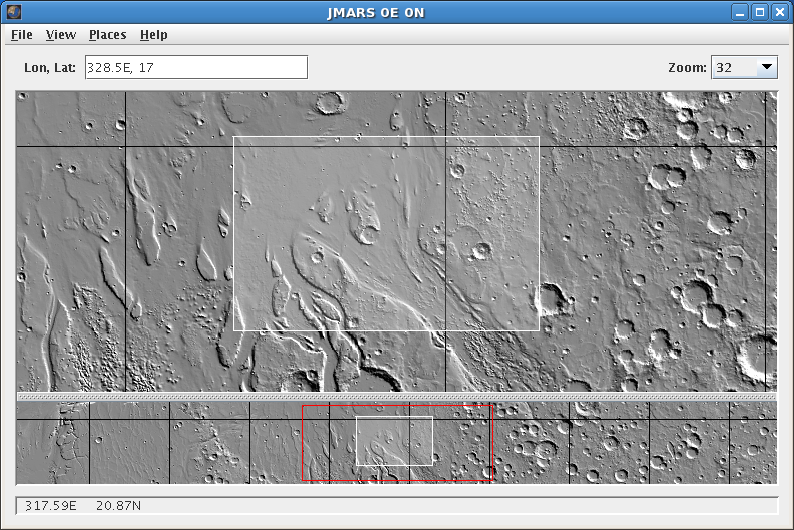
Step 3: Check VIS Coverage By Loading the Stamp Layer
- In the Layer Manager, click "Add New Layer" -> "Imagery" -> "THEMIS"
- In the "Image Type" drop-down box, chose "VIS"
- In the left-hand longitude box, right-click and choose "Set Lat/Lon Bounds to MainView"
- Since we are only interested in 18m VIS images, under the "Observation Parameters", set both the min and max "Summing" values to "1".
- We will leave the remaining search fields empty so our search is not too specific.
- Click the "OK" button and wait for the Stamps to appear in the Viewing Window.
- In the Layer Manager, go to the Stamp Layer focus panel, then to the "Settings" Tab. Adjust the transparency slider (Fill Alpha) to the middle of the slide bar to more easily see which areas have been covered and which haven't.
- In the "Settings" Tab, set the "Outline Color" and "Fill Color" to dark green. This will make it easier to see the ROIs as we enter them.
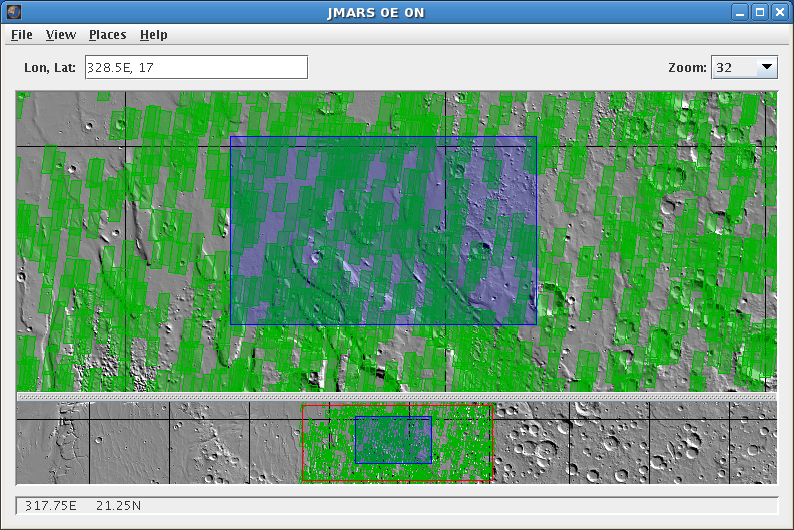
Since it would take dozens of images to fill in the coverage of this area, it would be very time consuming to identify each observation opportunity.
So instead, we will enter a Region of Interest (ROI) to notify the mission planners that they should image this area whenever possible.
Step 4: Loading the Region of Interest (ROI) Layer
- In the Layer Manager, , click the "Home" tab and select " THEMIS Team" -> "Online ROI"
- In the pop-up search bar, click "OK"
- This will display all of the ROIs you have entered before.
- You won't be able to see the ROIs entered by other users. Only the mission planners have access to all the ROIs in the database.
Step 5: Entering a Region of Interest (ROI)
- In the Layer Manager, select the "ROI Layer" as the active
layer.
- A blue outline should appear around the name.
- In the Main View, right-click in the area where we will be adding the ROI and chose "Add Mode".
- The ROI will be defined by a polygon. Left-click to place a corner point of the polygon. To complete the ROI,
you must end by clicking on the first point you made. (ROI's must be closed shapes.)
- When you close the ROI polygon, the sides will appear as thin blue lines.
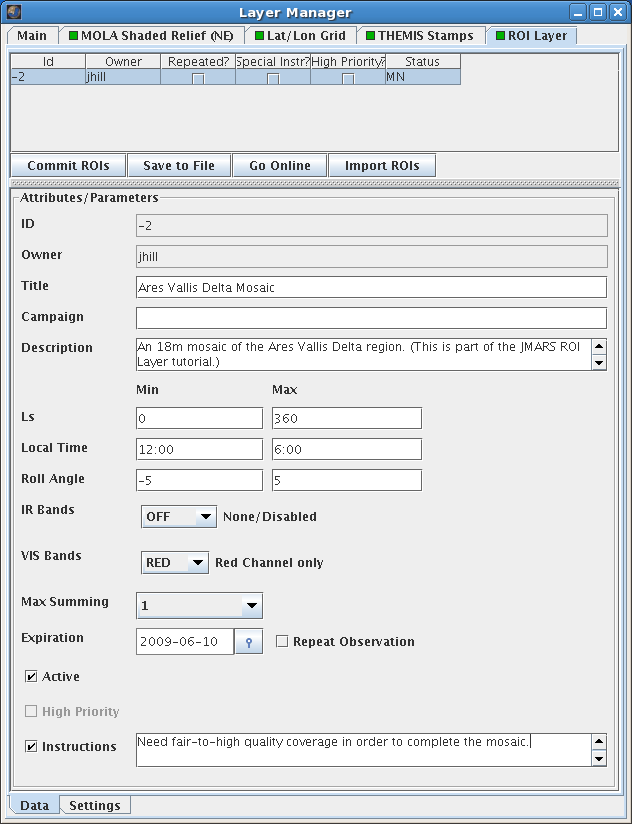
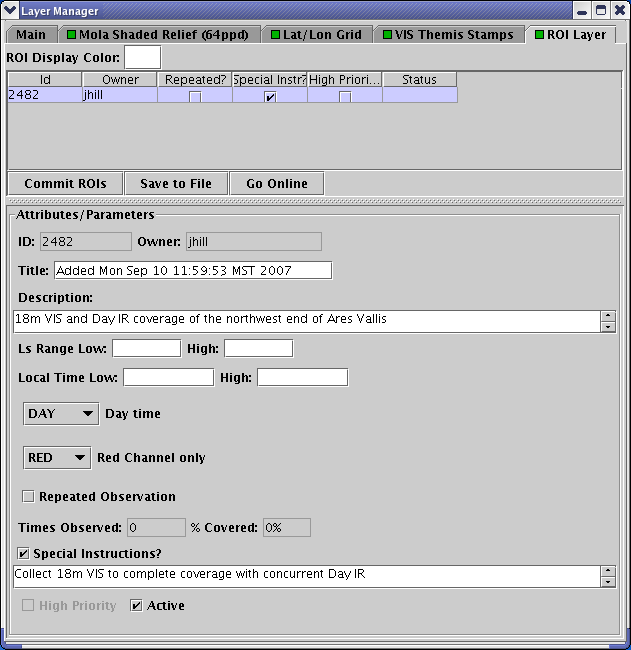
Step 6: Entering Parameters for the Region of Interest (ROI)
- In the Layer Manager, select the "ROI Layer" tab to view the
ROI focus panel.
- In the ROI table at the top of the focus panel, the ROI you are currently adding is highlighted.
- All the parameters for the ROI are listed in the "Attributes/Parameters" section at the bottom of the focus panel.
- In the "Description" field, we will enter "18m VIS coverage of the northwest end of Ares Vallis".
- Since we are only looking for coverage and have no requirements for Ls (Martian season) or Local Time, we will leave these fields blank.
- Since we only want 18m VIS, we will leave the IR Band Configuration button (the first one) to "OFF".
- The vast majority of THEMIS 18m VIS images are taken using only the RED band (band #3), so we will set the VIS Band Configuration button to "RED".
- Since we are only looking for one-time observations to complete coverage, we will leave the "Repeated Observations" box unchecked.
- We don't need to give the mission planners any more instructions, so we will leave the "Special Instructions" field blank.
- We want the mission planners to see this ROI when they are planning, so we will leave the "Active" box checked.
- Once the ROI and it's parameters are set, click on the "Commit ROIs" button in the middle of the focus panel.
- This will enter the ROI into the THEMIS ROI database and make it available to the mission planners. When the ROI has been committed, the outline will change to white. It will be much easier to see if you remove the stamps by clicking on the "M" and "p" buttons to the left of the "VIS Stamp Layer" in the Layer Manager.
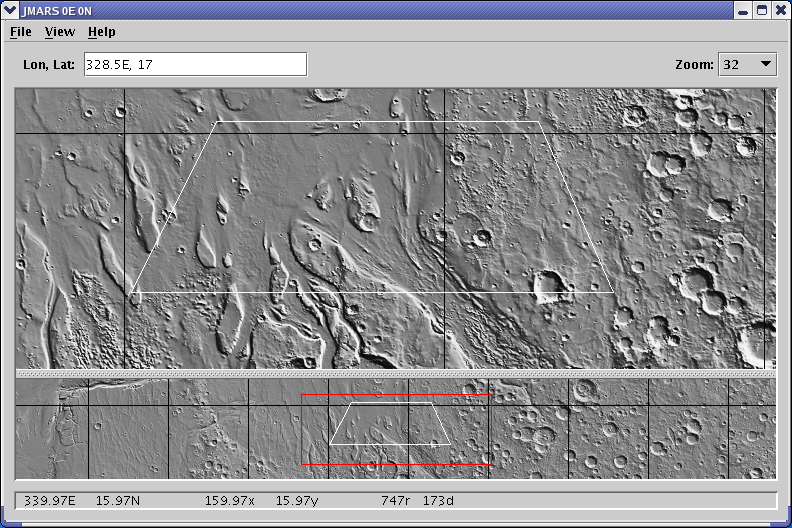
Step 7: Editing a Region of Interest (ROI)
- After loading the ROI Layer and selecting it as the active layer, right-click on the ROI and verify that the "Edit Mode" option is selected.
- Left-click on the ROI outline, which will change color to indicated it is being edited.
- We will change the shape of the ROI from a rectangle to a trapezoid. To do this, left-click and drag the bottom two points outward.
- We will also change the parameters in the focus panel to request that all VIS images are taken with an
accompanying Day IR image.
- Change the "Description" field to: "18m VIS and Day IR coverage of the northwest end of Ares Vallis"
- Change the IR band configuration from "OFF" to "DAY"
- Click the "Special Instructions" checkbox and add "Collect 18m VIS to complete coverage with concurrent Day IR" to the special instructions field.
- When you have finished the edits, click the "Commit ROIs" button in the middle of the focus panel.
- The ROI lines will change to white indicating the edits were entered into the database.
Congratulations! You have finished the fourth JMARS tutorial!
PREVIOUS: Finding
THEMIS Observation Opportunities NEXT: Loading
a Custom Map