
- Home
- Getting Started
- Documentation
- Release Notes
- Tour the Interface
- Tour the Layers
- JMARS Video Tutorials
- Lat/Lon Grid Layer
- Map Scalebar
- Nomenclature
- Crater Counting
- 3D
- Shape Layer
- Mosaics
- Map
- Advanced/Custom Maps
- Graphic/Numeric Maps
- Custom Map Sharing
- Stamp
- THEMIS
- MOC
- Viking
- CRISM Stamp Layer
- CTX
- HiRise
- HiRISE Anaglyph
- HiRISE DTM
- HRSC
- OMEGA
- Region of Interest
- TES
- THEMIS Planning
- Investigate Layer
- Landing Site Layer
- Tutorials
- Video Tutorials
- Displaying the Main View in 3D
- Finding THEMIS Observation Opportunities
- Submitting a THEMIS Region of Interest
- Loading a Custom Map
- Viewing TES Data in JMARS
- Using the Shape Layer
- Shape Layer: Intersect, Merge, and Subtract polygons from each other
- Shape Layer: Ellipse Drawing
- Shape Layer: Selecting a non-default column for circle-radius
- Shape Layer: Selecting a non-default column for fill-color
- Shape Layer: Add a Map Sampling Column
- Shape Layer: Adding a new color column based on the values of a radius column
- Shape Layer: Using Expressions
- Using JMARS for MSIP
- Introduction to SHARAD Radargrams
- Creating Numeric Maps
- Proxy/Firewall
- JMARS Shortcut Keys
- JMARS Data Submission
- FAQ
- Open Source
- References
- Social Media
- Podcasts/Demos
- Download JMARS
Using JMARS for MSIP
Welcome to the Using JMARS for MSIP Tutorial
What is JMARS?
JMARS Java Mission-planning and Analysis for Remote Sensing) is a computer program designed by the scientists and engineers at Arizona State University's Mars Space Flight Facility to access and view data from multiple Mars missions. Its main uses are:
- JMARS is used to plan all observations for the Thermal Emission Imaging System (THEMIS) aboard Mars Odyssey. It allows the THEMIS Mission Planners to see where Mars Odyssey will be in the near future, what the surface underneath it will look like and where THEMIS or other instruments have already collected data. JMARS is also used to plan observations for all the instruments on the Mars Reconnaissance Orbiter and will be used to plan observations for the LROC camera on the up-coming Lunar Reconnaissance Orbiter.
- Research scientists, graduate students and undergraduate students use JMARS to analyze data collected by the THEMIS camera, as well as most of the other instruments that have been sent to Mars. Not only does JMARS allow them to view the data from these instruments, but also to combine and compare it to data collected from other instruments. By using multiple data types at the same time, they are able to understand processes on Mars that would not be apparent from a single instrument's data.
- Since the research scientists and college students have had so much success using JMARS to study Mars, the Mars Education Program would like to make the program available to MSIP teams to use during their projects. We hope they will use JMARS to refine their science questions, analyze their THEMIS images and prepare materials for their final reports.
Mission Planning
Data Analysis
Mars Student Imaging Program
Installing JMARS
- Create a JMARS account at the Mars Space Flight Facility
- Go to: http://jmars.asu.edu/user/register to register for an account
- Fill out the registration form. A confirmation email will be sent to the email address you provide.
- Follow the link in the confirmation email to activate your account.
- Install JMARS
- Start JMARS
- Once JMARS has been installed on your computer, a JMARS icon will appear on your desktop. Simply click on the icon to start JMARS.
JMARS Basics
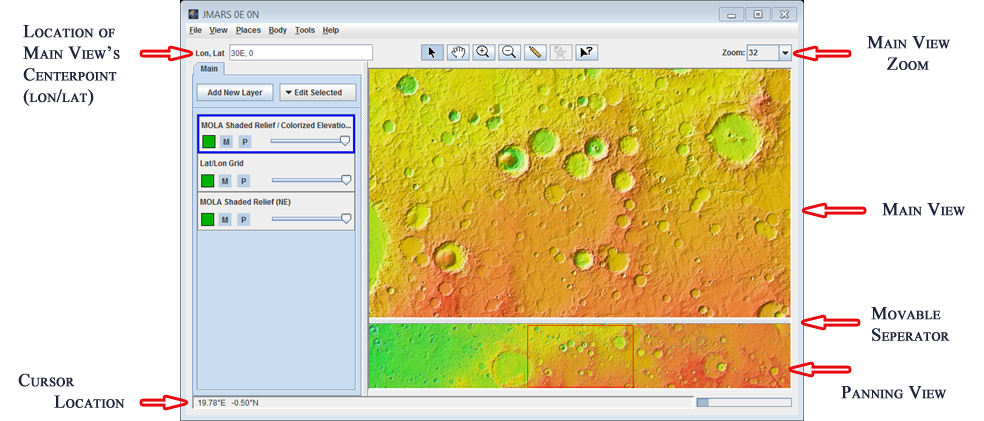
The JMARS program will open in one window that shows the Viewing Window(on the left) and the Layer Manager(on the right).
- Viewing Window
- The Viewing Window will show you different maps of Mars and allow you to see what areas the THEMIS camera will be flying over, as well as many other features for more advanced users.
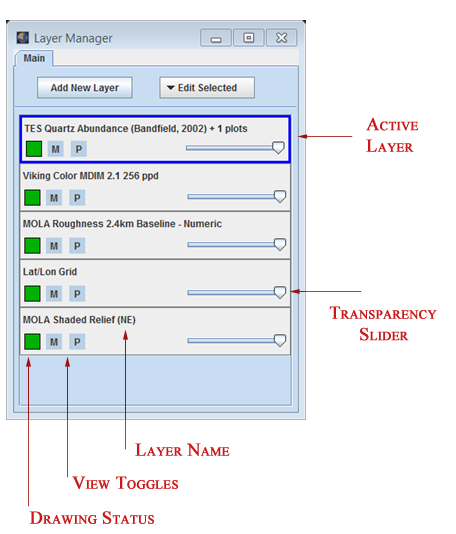
- Layer Manager
- The Layer Manager will show you what is being displayed in the Viewing Window. Much like Photoshop, the different "layers" can be stacked on top of each other and the Layer Manager allows you to re-order the layers.
Viewing Maps of Mars in JMARS
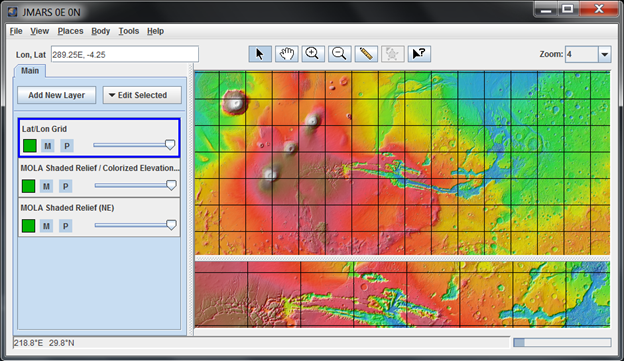
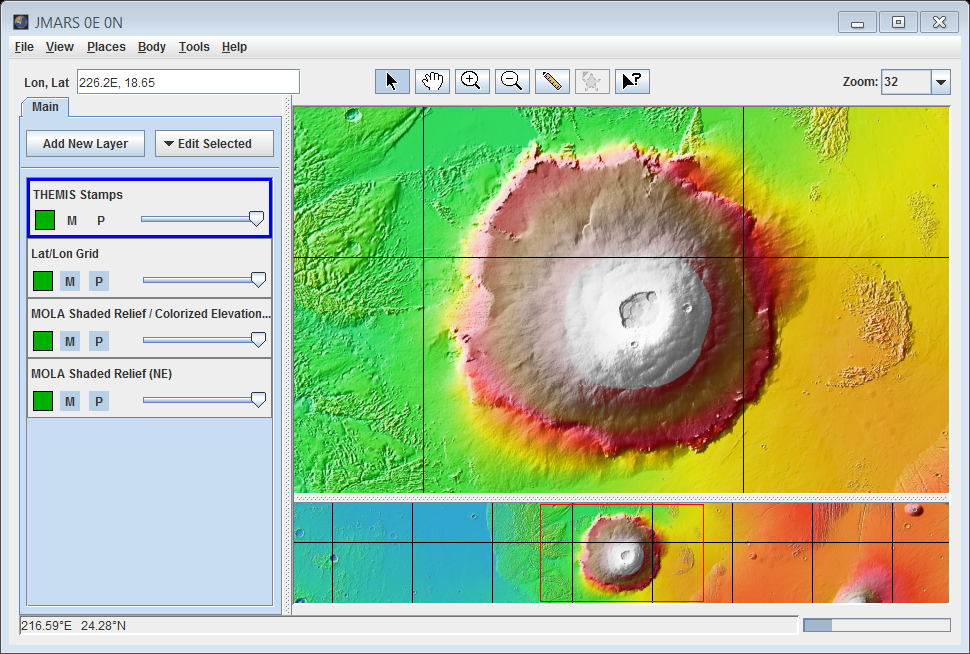
JMARS allows you to access many different global maps of Mars, each of which can give your students a different perspective of the planet. By default, JMARS will open with the black-and-white MOLA elevation map with a latitude/longitude grid on top of it. If you want to view the colorized MOLA elevation map:
- In the Layer Manager, click on "Add New Layer".
- Select "Maps by Instrument" -> "MOLA" -> "MOLA Colorized Elevation".
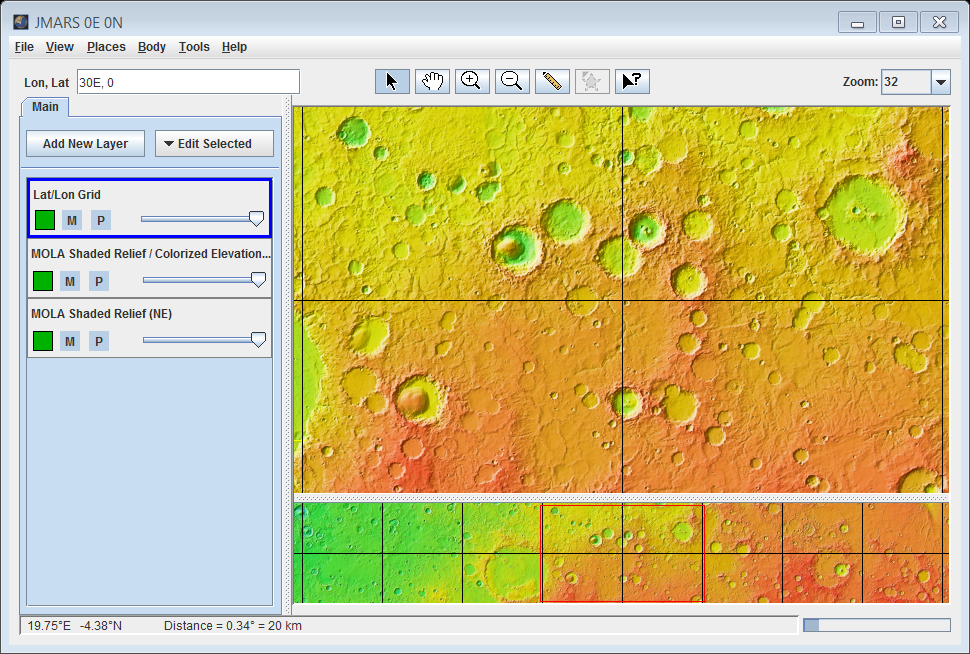
- The colorized MOLA map will be visible in the Viewing Window, but the Latitude/Longitude Grid will not be visible, since the new map was added on top of the Latitude/Longitude Grid in the Layer Manager. Left-click and drag on "Lat/Lon Grid" in the Layer Manager and drag it above the two MOLA maps. The grid will now be visible in the Viewing Window.
- If you want to switch back and forth between the two different MOLA maps, click on the "M" button to the left of "MOLA Shaded Relief/Colorized Elevation" in the Layer Manager to turn that map off and on.
- JMARS has many other maps available, such as:
HiRISE -> Instrument -> HiRISE ->HiRISE
- When you are done with a map and want to remove it, click on the name of the map in the Layer Manager and then click "Delete Layer".
- To make the remaining steps of the tutorial easier, delete all of the layers from Layer Manager except "MOLA Shaded Relief/Colorized Elevation" and "Lat/Lon Grid". Make sure the "Lat/Lon Grid" is placed above the "MOLA Colorized Elevation" in the Layer Manager so you can see the grid in the Viewing Window.
Finding the Names of Features on Mars
- The names of all the officially named features on Mars can be viewed using the Nomenclature Layer. To open the Nomenclature Layer, go to the Layer Manager and click Add New Layer -> Nomenclature. Then click on the "Nomenclature" tab at the top of the Layer Manager.
- All of the settings will be pre-set to appropriate values. Advanced users can change them if they would like.
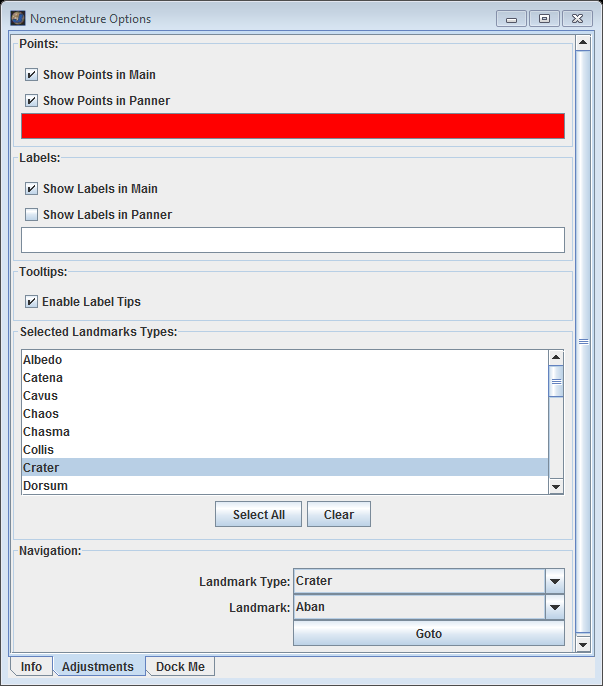
- To see all the feature names in the Viewing Window, click on the "Select All" button. Points will appear in the Viewing Window at the center of each named feature with the appropriate name next to it.
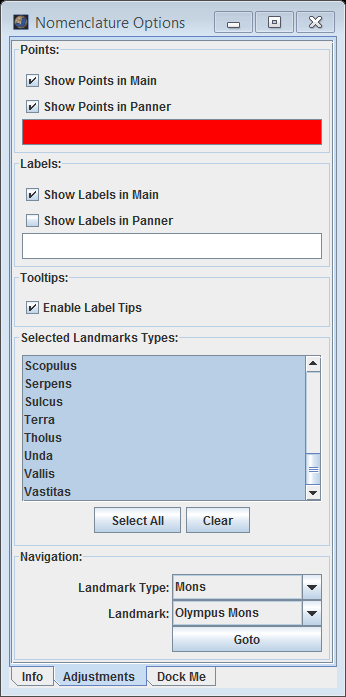
- To only view names for certain types of features (ex: mountains or "mons") click on a landmark type in the list of landmarks.
- To center the Viewing Window and a particular feature (ie: Olympus Mons), select the landmark type from the list (ie: Mons) and then select the specific feature (ie: Olympus Mons) from the "Landmark Types" drop-down menu at the bottom. Then click "Goto".
Finding and Viewing Images
- If your students are interested in taking an image of a specific area (ie: Olympus Mons), it can be helpful to look at previous images of the same location. To start, we'll open the THEMIS Stamp Layer by going to: Add New Layer -> Stamps -> THEMIS Stamps.
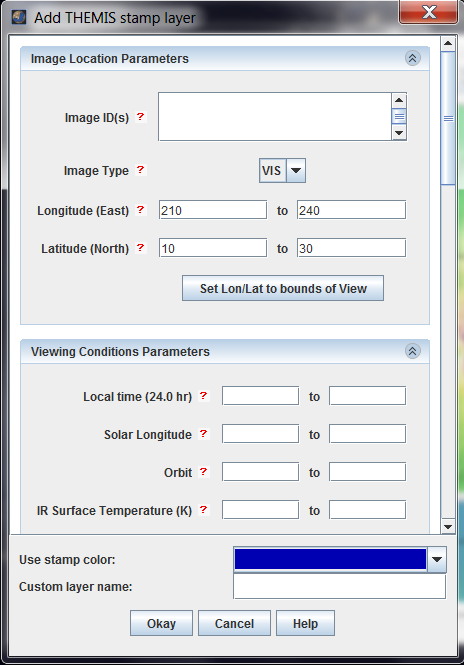
- A search box will open. Although there are a lot of search options, we will only be using a few of them:
- Under "Image Type", choose "VIS"
- Under "Longitude", enter "210" and "240" (These values are for Olympus Mons, they will change if you choose a different area.)
- Under "Latitude", enter "10" and "30" (These values are for Olympus Mons, they will change if you choose a different area.)
- Under "Summing", enter "1" and "1" (This tells JMARS to only search for full-resolution images.)
- Under "Image Rating", choose "4" and Blank (This will tell JMARS to return only good-quality images.)
- Click "Okay" to search for images
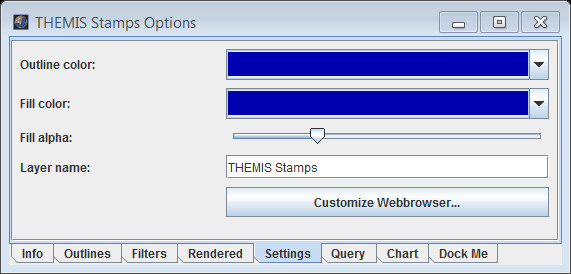
- Depending on the area, there may be so many outlines that it is hard to tell them apart. To help with this, click on the "THEMIS Stamps" tab at the top of the Layer Manager and then click on the "Settings" tab at the bottom. Adjust the "Fill Alpha" slide bar to about the midpoint. This will make the stamps only semi-transparent and much easier to tell apart.
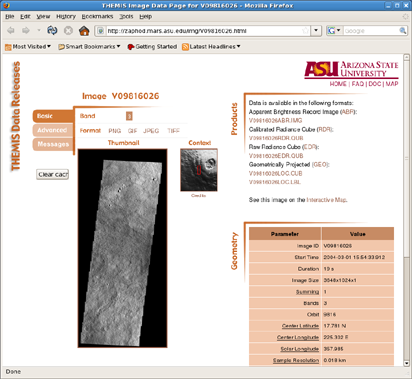
- To find a specific image, you may need to use the zoom pull-down menu in the upper right of the Viewing Window to zoom in more (ie: 64 or higher). To view a specific image, select it by left-clicking on it. (The outline will turn yellow.) Then right-click on it and choose "View THEMIS Stamps" -> "Stamp V########" -> Web Browse V########". The image will open in a web browser.
- V######## is a THEMIS image ID. Each image has its own ID number, so this will vary depending on what image you select.
- If you right-click on an area where multiple images are overlapping each other, the "View THEMIS Stamps" menu will give you the option of viewing all the THEMIS images which cover that point.

- Now, to prepare for the last step of this tutorial, we are going to temporarily turn off the THEMIS Stamp layer without deleting it. In the Layer Manager, click on the "Main" tab at the top. Click on the "M" and "P" to the left of "THEMIS Stamps". Even though the Stamp Layer is no longer displayed in the Viewing Window, we can bring it back later by just clicking on the "M" and "P" again, without re-entering all our search parameters.
Locating Potential Targets
- Since the THEMIS camera can only look straight down at Mars, it can only take images along the Odyssey spacecraft's groundtrack. To view the Odyssey (ODY) groundtrack for a given timeframe, go to the Layer Manager and click Add New Layer -> Groundtracks
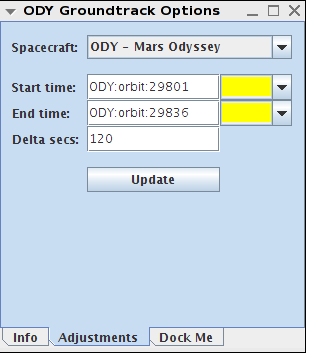
- In the Layer Manager, click on the "ODY Groundtrack" tab at the top. It will only display groundtracks for a certain time range, so you will need to enter a start and end time.
- You can use Greenwich Mean Time and type in the day and time like: ODY:UTC:2008 AUG 28 00:00:00
- Greenwich Mean Time, or UTC, is the only Earth time that JMARS understands
- You can also use orbit numbers to specify the time range like: ODY:orbit: 29801
- You can ask the MSIP instructors for an appropriate orbit range when your students are ready to begin looking for potential targets.
- For example, enter orbits 29801-29836 and click "Update".
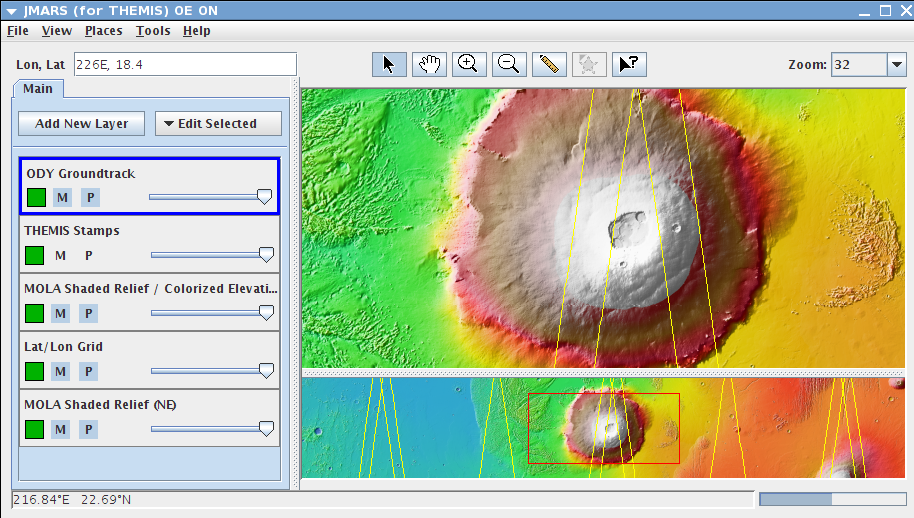
- JMARS will display daytime and nighttime groundtracks, but since the VIS camera only uses visible light, images must be taken on the daytime groundtracks.
- In the figure below, the daytime groundtracks (which always slant upward from left-to-right) have been colored green and the nighttime groundtracks (which always slant downward from left-to-right) have been colored red.
- The last step is to figure out where images have already been taken, since we usually try to avoid repeating observations (unless we are specifically trying to monitor surface changes). To do so, we are going to open the High Quality Coverage Map by going to Add New Layer -> Maps by Instrument -> THEMIS -> Coverage -> Quality VIS Sum 1 -> Quality Fair Visible Summing=1.
- In the Layer Manager, move the "Quality Fair Visible Summing=1" layer below the "ODY Groundtrack" layer so you can see the groundtracks more easily.
- You can see that after focusing on Olympus Mons for years, we have built up a lot of high-quality coverage. However, there are still some large gaps along the daytime groundtracks. Targeting your image in one of those gaps would ensure that your students would get an image of Mars that has never been taken before.
